Summary
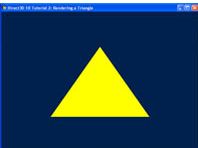
In the previous tutorial, we set up a vertex buffer and passed one triangle to the GPU.
이전 튜토리얼에서, 정점 버퍼를 설정한 후 GPU에 삼각형 하나를 전달했다.
Now, we will actually step through the graphics pipeline and look at how each stage works.
이제, 그래픽 파이프라인 실제 그래픽 파이프라인을 살펴보고 각 스테이지가 어떻게 동작하는지 알아볼 것이다.
The concept of shaders and the effect system will be explained.
셰이더와 효과 시스템의 컨셉을 설명할 것이다.
Note that this tutorial shares the same source code as the previous one, but will emphasize a different section.
이번 튜토리얼은 이전 튜토리얼과 소스코드를 공유하지만, 좀 다른 부분을 자세히 볼 것이다.
Source
(SDK root)\Samples\C++\Direct3D11\Tutorials\Tutorial03
The Graphics Pipeline
In the previous tutorial, we set up the vertex buffer, and then we associated a vertex layout with a vertex shader.
이전 튜토리얼에서 정점 버퍼를 설정하고 정점 레이아웃을 정점 셰이더와 연결했다.
Now, we will explain what a shader is and how it works.
이제 셰이더의 정의와 동작을 설명할 것이다.
To fully understand the individual shaders, we will take a step back and look at the whole graphical pipeline.
개개의 셰이더를 완전히 이해하기 위해서, 일단 한걸음 물러나 전체 그래픽 파이프라인을 살펴보도록 하자.
In Tutorial 2, when we called VSSetShader() and PSSetShader(), we actually bound our shader to a stage in the pipeline.
tutorial 2에서, VSSetShader()와 PSSetShader()를 호출하여 셰이더를 파이프라인의 각 스테이지에 바인드했다.
Then, when we called Draw, we start processing the vertex data passed into the graphics pipeline.
그런 다음, Draw()를 호출하여 정점 정보를 그래픽 파이프라인에 넘겨 처리했다.
The following sections describe in detail what happens after the Draw command.
다음 단락은 Draw() 명령을 호출했을 때 어떤 일이 일어나는지 자세히 서술할 것이다.
Shaders
In Direct3D 11, shaders reside in different stages of the graphics pipeline.
Direct3D 11에서 셰이더는 그래픽 파이프라인의 여러 단계에 존재한다.
They are short programs that, executed by the GPU, take certain input data, process that data, and then output the result to the next stage of the pipeline.
셰이더는 GPU에 의해 실행되는 작은 프로그램이다. 셰이더는 입력 데이터를 받아 처리하여 결과값을 파이프라인의 다음 스테이지로 넘긴다.
Direct3D 11 supports three basic types of shaders: vertex shader, geometry shader, and pixel shader.
Direct3D 11은 3개의 기본 셰이더를 지원한다: 정점 셰이더, 기하 셰이더, 픽셀 셰이더.
A vertex shader takes a vertex as input.
정점 셰이더는 정점을 입력으로 받는다.
It is run once for every vertex passed to the GPU via vertex buffers.
정점 셰이더는 정점 버퍼를 통해 GPU에 넘겨진 모든 정점에 대해 한 번씩 실행된다.
A geometry shader takes a primitive as input, and is run once for every primitive passed to the GPU.
기하 셰이더는 프리미티브을 입력으로 받고, 입력받은 모든 프리미티브에 대해 한 번씩 실행된다.
A primitive is a point, a line, or a triangle.
프리미티브는 점, 선, 삼각형이다.
A pixel shader takes a pixel (or sometimes called a fragment) as input, and is run once for each pixel of a primitive that we wish to render.
픽셀 셰이더는 픽셀(또는 조각이라 불리는)을 입력받고, 렌더링하고자 하는 프리미티브의 각 픽셀에 대해 한 번씩 실행된다.
Together, vertex, geometry, and pixel shaders are where the meat of the action occurs.
정점, 기하, 픽셀 셰이더는 함께 액션의 핵심을 이루는 곳이다.
When rendering with Direct3D 11, the GPU must have a valid vertex shader and pixel shader.
Direct3D 11로 렌더링을 수행할 때, GPU는 반드시 유효한 정점 셰이더와 픽셀 셰이더를 가져야 한다.
Geometry shader is an advanced feature in Direct3D 11 and is optional, so we will not discuss geometry shaders in this tutorial.
기하 셰이더는 Direct3D 11의 발전된 특성으로 필수적이지 않으며, 따라서 이번 튜토리얼에서는 기하 셰이더에 대해 논하지 않을 것이다.
In Direct3D 11 there are also hull and domain shaders for tessellation and compute shaders for compute.
Direct3D 11에는 또한 테셀레이션을 위한 헐, 도메인 셰이더와 계산을 위한 컴퓨트 셰이더가 있다.
For more information about these, see the other samples.
이것들에 대한 정보가 더 필요하다면, 다른 샘플들을 보도록 하자.
Vertex Shaders
Vertex shaders are short programs that are executed by the GPU on vertices.
정점 셰이더는 GPU에 의해 정점을 대상으로 실행되는 작은 프로그램이다.
Think of vertex shaders as C functions that take each vertex as input, process the input, and then output the modified vertex.
정점 셰이더를 C 함수와 마찬가지라고 생각해보자. 정점을 입력받고, 처리해서, 수정된 정점을 출력하는 것이다.
After the application passes vertex data to the GPU in the form of a vertex buffer, the GPU iterates through the vertices in the vertex buffer, and executes the active vertex shader once for each vertex, passing the vertex’s data to the vertex shader as input parameters.
실행프로그램이 정점 버퍼의 형태로 정점 데이터를 GPU에 전달하면 GPU는 정점 버퍼의 정점을 순회하며, 각 정점에 대해 활성 정점 셰이더를 한 번 실행하여 정점 데이터를 입력 파라미터로 정점 셰이더에 전달한다.
While a vertex shader can be used to carry out many tasks, the most important job of a vertex shader is transformation.
정점 셰이더는 많은 작업에 사용되지만, 정점 셰이더의 가장 중요한 일은 변환을 수행하는 것이다.
Transformation is the process of converting vectors from one coordinate system to another.
변환은 정점을 한 좌표계에서 다른 좌표계로 변환하는 과정이다.
For example, a triangle in a 3D scene may have its vertices at the positions (0, 0, 0) (1, 0, 0) (0, 1, 0).
예를 들어, 3차원 공간의 삼각형이 (0, 0, 0) (1, 0, 0) (0, 1, 0) 정점들로 이루어져 있다고 가정하자.
When the triangle is drawn on a 2D texture buffer, the GPU has to know the 2D coordinates of the points on the buffer that the vertices should be drawn at.
2D 텍스처 버퍼에 삼각형을 그릴 때 GPU는 버퍼에서 꼭지점이 그려져야 하는 지점의 2D 좌표를 알고 있어야 한다.
It is transformation that helps us accomplish this.
변환을 통해 이를 달성할 수 있다.
Transformation will be discussed in detail in the next tutorial.
변환에 대한 자세한 내용은 다음 튜토리얼에서 논의될 것이다.
For this tutorial, we will be using a simple vertex shader that does nothing except passing the input data through as output.
이 튜토리얼에서는 입력 데이터를 출력으로 전달하는 것 외에는 아무것도 하지 않는 간단한 정점 셰이더를 사용할 것이다.
In the Direct3D 11 tutorials, we will write our shaders in High-Level Shading Language (HLSL).
이 Direct3D 11 튜토리얼에서, 고수준 셰이딩 언어(HLSL)로 셰이더들을 작성할 것이다.
Recall that our vertex data has a 3D position element, and the vertex shader will do no processing on the input at all.
우리의 정점 정보는 3차원 위치 속성을 포함하고 있음을 되새기자. 그리고 정점 셰이더는 입력에 대해 어떠한 처리도 하지 않는다.
The resulting vertex shader looks like the following:
이러한 일을 하는 정점 셰이더는 다음과 같다:
float4 VS( float4 Pos : POSITION ) : SV_POSITION
{
	return Pos;
}
This vertex shader looks a lot like a C function.
정점 셰이더는 C 함수를 닮았다.
HLSL uses C-like syntax to make learning easier for C/C++ programmers.
HLSL은 C/C++ 프로그래머들의 학습을 용이하게 하기 위해 C와 비슷한 문법을 사용한다.
We can see that this vertex shader, named VS, takes a parameter of float4 type and returns a float4 value.
VS라 명명된 이 정점 셰이더가 float4 타입으로 파라미터를 입력받아 float4 값을 반환하는 것을 볼 수 있을 것이다.
In HLSL, a float4 is a 4-component vector where each component is a floating-point number.
HLSL에서, float4는 4개의 요소로 구성된 벡터이다. 각 요소는 부동소수점 수이다.
The colons define the semantics of the parameter as well as the return value.
:는 파라미터와 반환값의 semantic을 정의한다.
As mentioned above, the semantics in HLSL describe the nature of the data.
위에서 언급했듯이 HLSL의 semantic은 데이터의 특성을 설명한다.
In our shader above, we choose POSITION as the semantics of the Pos input parameter because this parameter will contain the vertex position.
위의 셰이더에서 입력 파라미터 Pos의 semantic으로 POSITION을 사용했다. 왜냐하면 이 파라미터는 정점의 위치 정보를 포함하기 때문이다.
The return value’s semantics, SV_POSITION, is a pre-defined semantics with special meaning.
반환 값의 semantic인 SV_POSITION은 특별한 의미를 가진 사전 정의된 semantic이다.
This semantics tells the graphics pipeline that the data associated with the semantics defines the clip-space position.
이 시맨틱은 그래픽 파이프라인에 시맨틱과 관련된 데이터가 클립-공간 위치를 정의한다고 알려준다.
This position is needed by the GPU in order to drawn pixels on the screen. (We will discuss clip-space in the next tutorial.)
이 위치 정보는 GPU가 화면에 픽셀을 그리는 데에 필요하다. (클립 좌표계에 대해서는 다음 튜토리얼 때 다룬다.)
In our shader, we take the input position data and output the exact same data back to the pipeline.
이번 단원의 셰이더에서, 입력으로 위치 정보를 받아 정확히 똑같은 데이터를 출력해 파이프라인으로 전달했다.
Pixel Shaders
Modern computer monitors are commonly raster display, which means the screen is actually a two-dimensional grid of small dots called pixels.
현대 컴퓨터의 모니터는 보통 디스플레이를 래스터한다. 즉 스크린은 픽셀이라 부르는 작은 점들이 2차원 평면의 형태로 나열된 것이다.
Each pixel contains a color independent of other pixels.
각 픽셀은 다른 픽셀들과는 독립적으로 색상을 보유한다.
When we render a triangle on the screen, we don’t really render a triangle as one entity.
스크린에 삼각형을 렌더할 때, 하나의 독립체로서 렌더하지 않는다.
Rather, we light up the group of pixels that are covered by the triangle’s area.
대신, 삼각형 영역으로 둘러싸인 픽셀들을 빛나게 한다.
Figure 2 shows an illustration of this.
그림 2는 이를 나타낸 것이다.
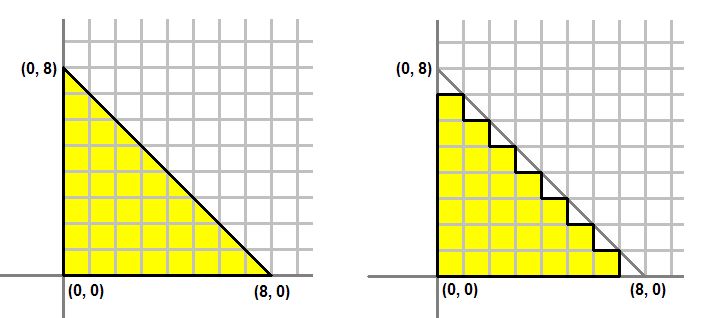
Figure 2. Left: What we would like to draw. Right: What is actually on the screen.
그림 2. 왼쪽:그리고자 하는 대상. 오른쪽: 스크린에 실제로 띄웠을 때
The process of converting a triangle defined by three vertices to a bunch of pixels covered by the triangle is called rasterization.
세 개의 꼭지점으로 정의된 삼각형을 삼각형이 덮는 픽셀 무리로 변환하는 과정을 래스터화라고 한다.
The GPU first determines what pixels are covered by the triangle being rendered.
처음에 GPU는 어떤 픽셀들이 렌더하고자 하는 삼각형에 둘러쌓여있는지 결정한다.
Then it invokes the active pixel shader for each of these pixels.
그런 다음 각각의 픽셀들에 대해 활성되어 있는 픽셀 셰이더를 호출한다.
A pixel shader’s primary purpose is to compute the color that each pixel should have.
픽셀 셰이더의 기본적인 목적은 각 픽셀이 어떤 색상을 보유해야 하는지를 계산하는 것이다.
The shader takes certain input about the pixel being colored, computes the pixel’s color, then outputs that color back to the pipeline.
셰이더는 채색되는 픽셀에 대한 특정 입력을 받아 픽셀의 색을 계산한 다음 해당 색을 파이프라인으로 다시 출력한다.
The input that it takes comes from the active geometry shader, or, if a geometry shader is not present, such as the case in this tutorial, the input comes directly from the vertex shader.
입력은 활성 기하 셰이더로부터 받으며, 이번 튜토리얼의 경우처럼 기하 셰이더가 존재하지 않을 경우 바로 정점 셰이더로부터 입력을 받는다.
The vertex shader we created above outputs a float4 with the semantics SV_POSITION.
위에서 만든 정점 셰이더는 SV_POSITION이라는 시맨틱을 동반하여 float4 값을 출력한다.
This will be the input of our pixel shader.
이는 곧 픽셀 셰이더의 입력이 된다.
Since pixel shaders output color values, the output of our pixel shader will be a float4.
픽셀 셰이더는 색상 값을 출력하므로 픽셀 셰이더의 출력은 float4가 된다.
We give the output the semantics SV_TARGET to signify outputting to the render target format.
출력에 렌더링 타깃 형식으로 출력한다는 의미로 SV_TARGET 시맨틱을 부여한다.
The pixel shader looks like the following:
픽셀 셰이더는 아래와 같다:
float4 PS( float4 Pos : SV_POSITION ) : SV_Target
{
	return float4( 1.0f, 1.0f, 0.0f, 1.0f );    // Yellow, with Alpha = 1
}
Creating the Shaders
In the application code, we will need to create a vertex shader and a pixel shader object.
실행프로그램 코드에서, 우리는 정점 셰이더와 픽셀 셰이더 객체를 생성해야 한다.
These objects represent our shaders, and are created by calling D3DX11CompileFromFile(). The code is demonstrated below:
이 객체들은 셰이더들을 나타내며, D3DX11CompileFromFile()을 호출함으로서 생성할 수 있다. 코드는 아래와 같다.
// Create the vertex shader
if( FAILED( D3DX11CompileFromFile( "Tutorial03.fx", NULL, NULL, "VS", "vs_4_0", D3DCOMPILE_ENABLE_STRICTNESS, NULL, NULL, &pVSBlob, &pErrorBlob, NULL ) ) )
	return FALSE;

// Create the pixel shader
if( FAILED( D3DX11CompileFromFile( "Tutorial03.fx", NULL, NULL, "PS", "ps_4_0", D3DCOMPILE_ENABLE_STRICTNESS, NULL, NULL, &pPSBlob, &pErrorBlob, NULL ) ) )
	return FALSE;
Putting It Together
After walking through the graphics pipeline, we can start to understand the process of rendering the triangle we created at the beginning of Tutorial 2.
그래픽 파이프라인을 체득함으로서, 이제 튜토리얼 2의 초반부에서 생성했던 삼각형을 렌더하는 과정을 이해할 수 있을 것이다.
Creating Direct3D applications requires two distinct steps.
Direct3D 실행프로그램을 생성하기 위해서는 두개의 별개의 과정이 필요하다.
The first would be creating the source data in vertex data, as we’ve done in Tutorial 2.
첫번째는 정점 데이터 안에 소스 데이터를 생성하는 것이다. 튜토리얼 2에서 이것을 수행했다.
The second stage would be to create the shaders which would transform that data for rendering, which we showed in this tutorial.
두번째 단계는 렌더링을 위해 데이터를 변환하는 셰이더를 생성하는 것이다. 이번 튜토리얼에서 이것을 수행했다.