rain, fire, smoke…
This tutorial will cover how to create particle systems in DirectX 11 using HLSL and C++.
이번 튜토리얼은 DirectX11에서 HLSL과 C++을 사용해서 파티클 시스템을 생성하는 법을 다룬다.
Particles are usually made by using a single texture placed on a quad.
파티클은 주로 쿼드에 놓여진 하나의 텍스처를 사용하여 만든다.
And then that quad is rendered hundreds of times each frame using some basic physics to mimic things such as snow, rain, smoke, fire, foliage, and numerous other systems that are generally made up of many small but similar elements.
그리고 그 쿼드는 하나의 프레임 당 몇백번이 넘게 렌더링된다. 파티클은 기초적인 물리학을 적용하여 구현되는데, 눈, 비, 연기, 불, 나뭇잎, 그리고 일반적으로 많고 서로 유사하고 미세한 입자로 구성되어 있는 다른 시스템을 모사하기 위해서이다.
In this particle tutorial we will use a single diamond texture and render it hundreds of times each frame to create a colorful diamond waterfall style effect.
이번 파티클 튜토리얼에서 우리는 하나의 다이아몬드 텍스처를 사용할 것이다. 그리고 그것을 각 프레임 당 수백번 렌더링하여 다채로운 색상의 다이아몬든 폭포 효과를 생성할 것이다.
Additionally, we will also use blending to blend the particles together so that layered particles cumulatively add their color to each other.
추가적으로, 우리는 블렌딩도 사용할 것이다. 결과적으로 파티클들은 서로 블렌드 되어 층을 이룬 파티클들이 점증적으로 그들의 색상을 다른 입자에 더할 것이다.
Make sure to also read the summary after going over the tutorial as that is where I explain how to expand this basic particle system into a more advanced, robust, and efficient implementation.
튜토리얼을 모두 살펴본 후에는 요약 부분도 꼭 읽어보세요.
그곳에서 이 기본적인 파티클 시스템을 더 고급스럽고, 견고하며, 효율적인 구현으로 확장하는 방법을 설명하고 있습니다.
Framework
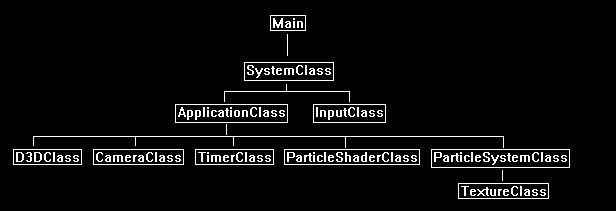
The framework for this tutorial has the basics as usual.
이번 튜토리얼을 위한 프레임워크는 언제나 그렇듯 기본적인 요소들로 구성된다.
It also uses the TimerClass for timing when to emit new particles.
이번에는 또한 새로운 입자를 방출할 타이밍을 구하기 위한 TimerClass를 사용한다.
The new class used for shading the particles is called ParticleShaderClass.
새로운 클래스인 ParticleShaderClass는 새로운 파티클을 셰이딩하기 위해 사용된다.
And finally, the new particle system itself is encapsulated in the ParticleSystemClass.
그리고 마침내, 새로운 파티클 시스템 그 스스로는 ParticleSystemClass에 의해 캡슐화될 것이다.
We will start the code section by looking at the particle shader first.
우리는 파티클 셰이더 코드 부분부터 살펴볼 것이다.
Particle.vs
The particle.vs and particle.ps HLSL shader programs are what we use to render the particles.
파티클을 렌더하기 위해 particle.vs와 particle.ps HLSL 셰이더 프로그램들을 사용한다.
They are the basic texture shader with an added color modifying component.
이것들은 기본 텍스처 셰이더에 색상 조정 기능이 추가된 형태이다.
/* Filename: particle.vs */

// Globals
cbuffer MatrixBuffer
{
	matrix worldMatrix;
	matrix viewMatrix;
	matrix projectionMatrix;
};

// Typedef
The two input types both have a color component so that the particle can have an individual color that is added to the texture base color.
두 개의 입력 형식은 둘 다 색상 요소를 가진다. 따라서 파티클은 텍스처의 기본적인 색깔에 추가되는 독립적인 색깔을 가질 수 있다.
struct VertexInputType
{
	float4 position:POSITION;
	float2 tex:TEXCOORD0;
	float4 color:COLOR;
};

struct PixelInputType
{
	float4 position:SV_POSITION;
	float2 tex:TEXCOORD0;
	float4 color:COLOR;
};

// Vertex Shader
PixelInputType ParticleVertexShader(VertexInputType input)
{
	PixelInputType output;

	// Change the position vector to be 4 units for proper matrix calculations.
	input.position.w = 1.0f;

	// Calculate the position of the vertex against the world, view, and projection matrices.
	output.position = mul(input.position, worldMatrix);
	output.position = mul(output.position, viewMatrix);
	output.position = mul(output.position, projectionMatrix);

	// Store the texture coordinates for the pixel shader.
	output.tex = input.tex;
The color is sent through to the pixel shader here.
색상은 다음의 부분을 통해 픽셀 셰이더로 전달된다.
	// Store the particle color for the pixel shader.
	output.color = input.color;

	return output;

}
Particle.ps
// Filename: particle.ps

// Global
Texture2D shaderTexture : register(t0);
SamplerState SampleType : register(s0);

// Typedefs
The PixelInputType has the added color component in the pixel shader also.
PixelInputType에는 픽셀 셰이더에서 사용할 수 있도록 색상(color) 컴포넌트도 추가되어 있습니다.
struct PixelInputType
{
	float4 position : SV_POSITION;
	float2 tex : TEXCOORD0;
	float4 color : COLOR;
};

// Pixel Shader

float4 ParticlePixelShader(PixelInputType input) : SV_TARGET
{
	float4 textureColor;
	float4 finalColor;

	// Sample the pixel color from the texture using the sampler at this texture coordinate location.
	textureColor = shaderTexture.Sample(SampleType, input.tex);
Here is where we combine the texture color and the input particle color to get the final output color.
다음은 텍스처의 색상과 입력받은 파티클 색상을 혼합하여 최종 색상을 더하는 부분이다.
	// Combine the texture color and the particle color to get the final color result.
	finalColor = textureColor * input.color;

	return finalColor;
}
Particleshaderclass.h
The ParticleShaderClass is just the TextureShaderClass modified to handle a color component for the particles.
ParticleShaderClass는 단지 파티클을 위한 색상 요소를 다루는 텍스처 셰이더 클래스이다.
// Filename : Particleshaderclass.h
#pragma once

// INCLUDES

#include <d3d11.h>
#include <d3dcompiler.h>
#include <directxmath.h>
#include <fstream>

using namespace DirectX;
using namespace std;

// Class name: ParticleShaderClass

class ParticleShaderClass
{
private:
	struct MatrixBufferType
	{
		XMMATRIX world;
		XMMATRIX view;
		XMMATRIX projection;
	};

public:
	ParticleShaderClass();
	ParticleShaderClass(const ParticleShaderClass&);
	~ParticleShaderClass();

	bool Initialize(ID3D11Device*, HWND);
	void Shutdown();
	bool Render(ID3D11DeviceContext*, int, XMMATRIX, XMMATRIX, XMMATRIX, ID3D11ShaderResourceView*);

private:
	bool InitializeShader(ID3D11Device*, HWND, WCHAR*, WCHAR*);
	void ShutdownShader();
	void OutputShaderErrorMessage(ID3D10Blob*, HWND, WCHAR*);

	bool SetShaderParameters(ID3D11DeviceContext*, XMMATRIX, XMMATRIX, XMMATRIX, ID3D11ShaderResourceView*);
	void RenderShader(ID3D11DeviceContext*, int);

private:
	ID3D11VertexShader* m_vertexShader;
	ID3D11PixelShader* m_pixelShader;
	ID3D11InputLayout* m_layout;
	ID3D11Buffer* m_matrixBuffer;
	ID3D11SamplerState* m_sampleState;
};
Particleshaderclass.cpp
////////////////////////////////////////////////////////////////////////////////
// Filename: particleshaderclass.cpp
////////////////////////////////////////////////////////////////////////////////
#include "particleshaderclass.h"


ParticleShaderClass::ParticleShaderClass()
{
    m_vertexShader = 0;
    m_pixelShader = 0;
    m_layout = 0;
    m_matrixBuffer = 0;
    m_sampleState = 0;
}


ParticleShaderClass::ParticleShaderClass(const ParticleShaderClass& other)
{
}


ParticleShaderClass::~ParticleShaderClass()
{
}


bool ParticleShaderClass::Initialize(ID3D11Device* device, HWND hwnd)
{
    wchar_t vsFilename[128], psFilename[128];
    int error;
    bool result;
We load the particle.vs and particle.ps HLSL shader files here.
이 부분에서 particle.vs와 particle.ps hlsls 셰이더 파일을 로드한다.
	// Set the filename of the vertex shader.
    error = wcscpy_s(vsFilename, 128, L"../Engine/particle.vs");
    if(error != 0)
    {
        return false;
    }

    // Set the filename of the pixel shader.
    error = wcscpy_s(psFilename, 128, L"../Engine/particle.ps");
    if(error != 0)
    {
        return false;
    }

    // Initialize the vertex and pixel shaders.
    result = InitializeShader(device, hwnd, vsFilename, psFilename);
    if(!result)
    {
        return false;
    }

    return true;
}


void ParticleShaderClass::Shutdown()
{
    // Shutdown the vertex and pixel shaders as well as the related objects.
    ShutdownShader();

    return;
}


bool ParticleShaderClass::Render(ID3D11DeviceContext* deviceContext, int indexCount, XMMATRIX worldMatrix, XMMATRIX viewMatrix, XMMATRIX projectionMatrix, ID3D11ShaderResourceView* texture)
{
    bool result;


    // Set the shader parameters that it will use for rendering.
    result = SetShaderParameters(deviceContext, worldMatrix, viewMatrix, projectionMatrix, texture);
    if(!result)
    {
        return false;
    }

    // Now render the prepared buffers with the shader.
    RenderShader(deviceContext, indexCount);

    return true;
}


bool ParticleShaderClass::InitializeShader(ID3D11Device* device, HWND hwnd, WCHAR* vsFilename, WCHAR* psFilename)
{
    HRESULT result;
    ID3D10Blob* errorMessage;
    ID3D10Blob* vertexShaderBuffer;
    ID3D10Blob* pixelShaderBuffer;
The layout will require a third element.
레이아웃은 세번째 인자를 필요로 한다.
	D3D11_INPUT_ELEMENT_DESC polygonLayout[3];
    unsigned int numElements;
    D3D11_BUFFER_DESC matrixBufferDesc;
    D3D11_SAMPLER_DESC samplerDesc;


    // Initialize the pointers this function will use to null.
    errorMessage = 0;
    vertexShaderBuffer = 0;
    pixelShaderBuffer = 0;
Load the particle vertex shader here.
이 부분에서 파티클 정점 셰이더를 로드한다.
	// Compile the vertex shader code.
    result = D3DCompileFromFile(vsFilename, NULL, NULL, "ParticleVertexShader", "vs_5_0", D3D10_SHADER_ENABLE_STRICTNESS, 0,
                                &vertexShaderBuffer, &errorMessage);
    if(FAILED(result))
    {
        // If the shader failed to compile it should have writen something to the error message.
        if(errorMessage)
        {
            OutputShaderErrorMessage(errorMessage, hwnd, vsFilename);
        }
        // If there was nothing in the error message then it simply could not find the shader file itself.
        else
        {
            MessageBox(hwnd, vsFilename, L"Missing Shader File", MB_OK);
        }

        return false;
    }
여기서 파티클 픽셀 셰이더를 로드한다.
	// Compile the pixel shader code.
    result = D3DCompileFromFile(psFilename, NULL, NULL, "ParticlePixelShader", "ps_5_0", D3D10_SHADER_ENABLE_STRICTNESS, 0,
                                &pixelShaderBuffer, &errorMessage);
    if(FAILED(result))
    {
        // If the shader failed to compile it should have writen something to the error message.
        if(errorMessage)
        {
            OutputShaderErrorMessage(errorMessage, hwnd, psFilename);
        }
        // If there was nothing in the error message then it simply could not find the file itself.
        else
        {
            MessageBox(hwnd, psFilename, L"Missing Shader File", MB_OK);
        }

        return false;
    }

    // Create the vertex shader from the buffer.
    result = device->CreateVertexShader(vertexShaderBuffer->GetBufferPointer(), vertexShaderBuffer->GetBufferSize(), NULL, &m_vertexShader);
    if(FAILED(result))
    {
        return false;
    }

    // Create the pixel shader from the buffer.
    result = device->CreatePixelShader(pixelShaderBuffer->GetBufferPointer(), pixelShaderBuffer->GetBufferSize(), NULL, &m_pixelShader);
    if(FAILED(result))
    {
        return false;
    }

    // Create the vertex input layout description.
    polygonLayout[0].SemanticName = "POSITION";
    polygonLayout[0].SemanticIndex = 0;
    polygonLayout[0].Format = DXGI_FORMAT_R32G32B32_FLOAT;
    polygonLayout[0].InputSlot = 0;
    polygonLayout[0].AlignedByteOffset = 0;
    polygonLayout[0].InputSlotClass = D3D11_INPUT_PER_VERTEX_DATA;
    polygonLayout[0].InstanceDataStepRate = 0;

    polygonLayout[1].SemanticName = "TEXCOORD";
    polygonLayout[1].SemanticIndex = 0;
    polygonLayout[1].Format = DXGI_FORMAT_R32G32_FLOAT;
    polygonLayout[1].InputSlot = 0;
    polygonLayout[1].AlignedByteOffset = D3D11_APPEND_ALIGNED_ELEMENT;
    polygonLayout[1].InputSlotClass = D3D11_INPUT_PER_VERTEX_DATA;
    polygonLayout[1].InstanceDataStepRate = 0;
Add a third component to the layout for the particle shader.
파티클 셰이더를 위해 레이아웃에 세번째 요소를 추가한다.
The third component is the individual color of each particle.
세번째 요소는 각 파티클을 위한 독립적인 색상이다.
	polygonLayout[2].SemanticName = "COLOR";
    polygonLayout[2].SemanticIndex = 0;
    polygonLayout[2].Format = DXGI_FORMAT_R32G32B32A32_FLOAT;
    polygonLayout[2].InputSlot = 0;
    polygonLayout[2].AlignedByteOffset = D3D11_APPEND_ALIGNED_ELEMENT;
    polygonLayout[2].InputSlotClass = D3D11_INPUT_PER_VERTEX_DATA;
    polygonLayout[2].InstanceDataStepRate = 0;

    // Get a count of the elements in the layout.
    numElements = sizeof(polygonLayout) / sizeof(polygonLayout[0]);

    // Create the vertex input layout.
    result = device->CreateInputLayout(polygonLayout, numElements, vertexShaderBuffer->GetBufferPointer(),
                                       vertexShaderBuffer->GetBufferSize(), &m_layout);
    if(FAILED(result))
    {
        return false;
    }

    // Release the vertex shader buffer and pixel shader buffer since they are no longer needed.
    vertexShaderBuffer->Release();
    vertexShaderBuffer = 0;

    pixelShaderBuffer->Release();
    pixelShaderBuffer = 0;

    // Setup the description of the dynamic matrix constant buffer that is in the vertex shader.
    matrixBufferDesc.Usage = D3D11_USAGE_DYNAMIC;
    matrixBufferDesc.ByteWidth = sizeof(MatrixBufferType);
    matrixBufferDesc.BindFlags = D3D11_BIND_CONSTANT_BUFFER;
    matrixBufferDesc.CPUAccessFlags = D3D11_CPU_ACCESS_WRITE;
    matrixBufferDesc.MiscFlags = 0;
    matrixBufferDesc.StructureByteStride = 0;

    // Create the constant buffer pointer so we can access the vertex shader constant buffer from within this class.
    result = device->CreateBuffer(&matrixBufferDesc, NULL, &m_matrixBuffer);
    if(FAILED(result))
    {
        return false;
    }

    // Create a texture sampler state description.
    samplerDesc.Filter = D3D11_FILTER_MIN_MAG_MIP_LINEAR;
    samplerDesc.AddressU = D3D11_TEXTURE_ADDRESS_WRAP;
    samplerDesc.AddressV = D3D11_TEXTURE_ADDRESS_WRAP;
    samplerDesc.AddressW = D3D11_TEXTURE_ADDRESS_WRAP;
    samplerDesc.MipLODBias = 0.0f;
    samplerDesc.MaxAnisotropy = 1;
    samplerDesc.ComparisonFunc = D3D11_COMPARISON_ALWAYS;
    samplerDesc.BorderColor[0] = 0;
    samplerDesc.BorderColor[1] = 0;
    samplerDesc.BorderColor[2] = 0;
    samplerDesc.BorderColor[3] = 0;
    samplerDesc.MinLOD = 0;
    samplerDesc.MaxLOD = D3D11_FLOAT32_MAX;

    // Create the texture sampler state.
    result = device->CreateSamplerState(&samplerDesc, &m_sampleState);
    if(FAILED(result))
    {
        return false;
    }

    return true;
}


void ParticleShaderClass::ShutdownShader()
{
    // Release the sampler state.
    if(m_sampleState)
    {
        m_sampleState->Release();
        m_sampleState = 0;
    }

    // Release the matrix constant buffer.
    if(m_matrixBuffer)
    {
        m_matrixBuffer->Release();
        m_matrixBuffer = 0;
    }

    // Release the layout.
    if(m_layout)
    {
        m_layout->Release();
        m_layout = 0;
    }

    // Release the pixel shader.
    if(m_pixelShader)
    {
        m_pixelShader->Release();
        m_pixelShader = 0;
    }

    // Release the vertex shader.
    if(m_vertexShader)
    {
        m_vertexShader->Release();
        m_vertexShader = 0;
    }

    return;
}


void ParticleShaderClass::OutputShaderErrorMessage(ID3D10Blob* errorMessage, HWND hwnd, WCHAR* shaderFilename)
{
    char* compileErrors;
    unsigned long long bufferSize, i;
    ofstream fout;


    // Get a pointer to the error message text buffer.
    compileErrors = (char*)(errorMessage->GetBufferPointer());

    // Get the length of the message.
    bufferSize = errorMessage->GetBufferSize();

    // Open a file to write the error message to.
    fout.open("shader-error.txt");

    // Write out the error message.
    for(i=0; i<bufferSize; i++)
    {
        fout << compileErrors[i];
    }

    // Close the file.
    fout.close();

    // Release the error message.
    errorMessage->Release();
    errorMessage = 0;

    // Pop a message up on the screen to notify the user to check the text file for compile errors.
    MessageBox(hwnd, L"Error compiling shader.  Check shader-error.txt for message.", shaderFilename, MB_OK);

    return;
}
The SetShaderParameters function is the same as the texture shader class since we only set the three matrices and the texture.
SetShaderParameters 함수는 오직 세 개의 행렬과 텍스처만 설정한다는 점에서 텍스처 셰이더 클래스와 같다.
bool ParticleShaderClass::SetShaderParameters(ID3D11DeviceContext* deviceContext, XMMATRIX worldMatrix, XMMATRIX viewMatrix,
                                              XMMATRIX projectionMatrix, ID3D11ShaderResourceView* texture)
{
    HRESULT result;
    D3D11_MAPPED_SUBRESOURCE mappedResource;
    MatrixBufferType* dataPtr;
    unsigned int bufferNumber;


    // Transpose the matrices to prepare them for the shader.
    worldMatrix = XMMatrixTranspose(worldMatrix);
    viewMatrix = XMMatrixTranspose(viewMatrix);
    projectionMatrix = XMMatrixTranspose(projectionMatrix);

    // Lock the constant buffer so it can be written to.
    result = deviceContext->Map(m_matrixBuffer, 0, D3D11_MAP_WRITE_DISCARD, 0, &mappedResource);
    if(FAILED(result))
    {
        return false;
    }

    // Get a pointer to the data in the constant buffer.
    dataPtr = (MatrixBufferType*)mappedResource.pData;

    // Copy the matrices into the constant buffer.
    dataPtr->world = worldMatrix;
    dataPtr->view = viewMatrix;
    dataPtr->projection = projectionMatrix;

    // Unlock the constant buffer.
    deviceContext->Unmap(m_matrixBuffer, 0);

    // Set the position of the constant buffer in the vertex shader.
    bufferNumber = 0;

    // Finally set the constant buffer in the vertex shader with the updated values.
    deviceContext->VSSetConstantBuffers(bufferNumber, 1, &m_matrixBuffer);

    // Set shader texture resource in the pixel shader.
    deviceContext->PSSetShaderResources(0, 1, &texture);

    return true;
}


void ParticleShaderClass::RenderShader(ID3D11DeviceContext* deviceContext, int indexCount)
{
    // Set the vertex input layout.
    deviceContext->IASetInputLayout(m_layout);

    // Set the vertex and pixel shaders that will be used to render this triangle.
    deviceContext->VSSetShader(m_vertexShader, NULL, 0);
    deviceContext->PSSetShader(m_pixelShader, NULL, 0);

    // Set the sampler state in the pixel shader.
    deviceContext->PSSetSamplers(0, 1, &m_sampleState);

    // Render the triangle.
    deviceContext->DrawIndexed(indexCount, 0, 0);

    return;
}
Particlesystemclass.h
//////////////
// INCLUDES //
//////////////
#include <d3d11.h>
#include <directxmath.h>
using namespace DirectX;


///////////////////////
// MY CLASS INCLUDES //
///////////////////////
#include "textureclass.h"


////////////////////////////////////////////////////////////////////////////////
// Class name: ParticleSystemClass
////////////////////////////////////////////////////////////////////////////////
class ParticleSystemClass
{
private:
The VertexType for rendering particles just requires position, texture coordinates, and color to match up with the ParticleType properties.
렌더링할 파티클을 위한 VertexType은 ParticleType 요소와 매치하기 위해 오직 위치, 텍스처 좌표, 그리고 색상만을 요구한다.
	struct VertexType
    {
        XMFLOAT3 position;
        XMFLOAT2 texture;
        XMFLOAT4 color;
    };
Particles can have any number of properties that define them.
파티클은 스스로를 정의하기 위해 어떠한 개수의 프로퍼티도 가질 수 있다.
In this implementation we put all the properties of a particle in the ParticleType structure.
이번 예제에서 우리는 파티클의 모든 프로퍼티를 ParticleType 구조체에 넣을 것이다.
You can add many more but for this tutorial I am just going to cover position, speed, and color.
더 많은 프로퍼티를 추가할 수도 있지만 이번 튜토리얼에서는 위치, 속도, 그리고 색상만을 다룬다.
	struct ParticleType
    {
        float positionX, positionY, positionZ;
        float red, green, blue;
        float velocity;
        bool active;
    };

public:
    ParticleSystemClass();
    ParticleSystemClass(const ParticleSystemClass&);
    ~ParticleSystemClass();
The class functions are the regular initialize, shutdown, frame, and render.
이 클래스는 보통 사용하는 initialize, shutdown, frame, render 함수들을 포함하고 있습니다.
However, note that the Frame function is where we do all the work of updating, sorting, and rebuilding the of vertex buffer each frame so the particles can be rendered correctly.
다만 유의해야 할 점은, 파티클이 제대로 렌더링되도록 하기 위해 Frame 함수 내에서 매 프레임마다 파티클의 업데이트, 정렬, 그리고 정점 버퍼의 재구성이 이루어진다는 점입니다.
    bool Initialize(ID3D11Device*, ID3D11DeviceContext*, char*);
    void Shutdown();
    bool Frame(float, ID3D11DeviceContext*);
    void Render(ID3D11DeviceContext*);

    ID3D11ShaderResourceView* GetTexture();
    int GetIndexCount();

private:
    bool LoadTexture(ID3D11Device*, ID3D11DeviceContext*, char*);
    void ReleaseTexture();

    bool InitializeParticleSystem();
    void ShutdownParticleSystem();

    bool InitializeBuffers(ID3D11Device*);
    void ShutdownBuffers();
    void RenderBuffers(ID3D11DeviceContext*);

    void EmitParticles(float);
    void UpdateParticles(float);
    void KillParticles();
    bool UpdateBuffers(ID3D11DeviceContext*);

private:
We use a single texture for all the particles in this tutorial.
이번 튜토리얼에서 구현하는 모든 파티클들은 하나의 텍스처를 사용하여 만든다.
TextureClass* m_Texture;
The particle system is an array of particles made up from the ParticleType structure.
파티클 시스템은 ParticleType 구조체로부터 생성된 파티클 배열이다.
ParticleType* m_particleList;
The next variables are for setting up a single vertex and index buffer.
다음 변수들은 하나의 정점과 하나의 인덱스 버퍼를 설정하기 위한 것들이다.
Note that the vertex buffer will be dynamic since it will change all particle positions each frame.
	VertexType* m_vertices;
    ID3D11Buffer* m_vertexBuffer, * m_indexBuffer;
    int m_vertexCount, m_indexCount;
The following private class variables are the ones used for the particle properties.
다음의 private 클래스 멤버변수들은 파티클 프로퍼티를 위해 사용되는 것들이다.
They define how the particle system will work and changing each of them has a unique effect on how the particle system will react.
이 값들은 파티클 시스템이 어떻게 동작할지를 정의하며, 각 값을 변경하면 파티클 시스템의 반응 방식에 고유한 영향을 미치게 됩니다.
If you plan to add more functionality to the particle system you would add it here by using additional variables for modifying the particles.
만약 파티클 시스템에 추가 기능을 넣는 것을 계획하고 있다면 파티클을 변경하기 위한 추가적인 변수를 여기에 추가하면 된다.
	float m_particleDeviationX, m_particleDeviationY, m_particleDeviationZ;
    float m_particleVelocity, m_particleVelocityVariation;
    float m_particleSize, m_particlesPerSecond;
    int m_maxParticles;
We require a count and an accumulated time variable for timing the emission of particles.
파티클 방출 타이밍을 제어하기 위해서는 카운트 변수와 누적 시간(accumulated time) 변수가 필요합니다.
	int m_currentParticleCount;
    float m_accumulatedTime;
};
Particlesystemclass.cpp
////////////////////////////////////////////////////////////////////////////////
// Filename: particlesystemclass.cpp
////////////////////////////////////////////////////////////////////////////////
#include "particlesystemclass.h"
The class constructor initializes the private member variables to null.
클래스 생성자는 private 멤버 변수를 null로 초기화한다.
ParticleSystemClass::ParticleSystemClass()
{
    m_Texture = 0;
    m_particleList = 0;
    m_vertices = 0;
    m_vertexBuffer = 0;
    m_indexBuffer = 0;
}


ParticleSystemClass::ParticleSystemClass(const ParticleSystemClass& other)
{
}


ParticleSystemClass::~ParticleSystemClass()
{
}
The Initialize function first loads the texture that will be used for the particles.
Initialize 함수는 처음에 파티클에 사용될 텍스처를 로드한다.
After the texture is loaded it then initializes the particle system.
텍스처가 로드되면 텍스처는 파티클 시스템을 시작한다.
Once the particle system has been initialized it then creates the initial empty vertex and index buffers.
파티클 시스템이 시작되면 초기 공백 정점 버퍼와 인텍스 버퍼를 생성한다.
The buffers are created empty at first as there are no particles emitted yet.
버퍼는 처음에는 분출한 파티클이 없기 때문에 비어있는 상태로 생성된다.
bool ParticleSystemClass::Initialize(ID3D11Device* device, ID3D11DeviceContext* deviceContext, char* textureFilename)
{
    bool result;


    // Load the texture that is used for the particles.
    result = LoadTexture(device, deviceContext, textureFilename);
    if(!result)
    {
        return false;
    }

    // Initialize the particle system.
    result = InitializeParticleSystem();
    if(!result)
    {
        return false;
    }

    // Create the buffers that will be used to render the particles with.
    result = InitializeBuffers(device);
    if(!result)
    {
        return false;
    }

    return true;
}
The Shutdown function releases the buffers, particle system, and particle texture.
Shutdown 함수는 버퍼, 파티클 시스템, 파티클 텍스처를 해제한다.
void ParticleSystemClass::Shutdown()
{
    // Release the buffers.
    ShutdownBuffers();

    // Release the particle system.
    ShutdownParticleSystem();

    // Release the texture used for the particles.
    ReleaseTexture();

    return;
}
The Frame function is where we do the majority of the particle system work.
Frame 함수는 파티클 시스템 동작의 핵심이 위치한 곳이다.
Each frame we first check if we need to clear some of the particles that have reached the end of their render life.
각 프레임마다 처음으로 실시하는 동작은 수명이 다해 소멸시켜야 할 파티클이 있는지 확인하는 것이다.
Secondly, we emit new particles if it is time to do so.
두번째 동작은, 만약 그래야 할 때가 되었다면 새로운 파티클을 분출한다.
After we emit new particles, we then update all the particles that are currently emitted, in this tutorial we update their height position to create a falling effect.
새로운 파티클을 분출한 다음에, 현재 분출 중인 파티클들을 갱신한다. 이번 튜토리얼에서 낙하 효과를 주기위해 입자의 높이를 갱신할 것이다.
After the particles have been updated, we then need to update the vertex buffer with the updated location of each particle.
파티클이 업데이트된 다음에, 정점 버퍼를 각 파티클들의 수정된 위치로 갱신해야 한다.
The vertex buffer is dynamic so updating it is easy to do.
정점 버퍼는 동적이므로 갱신은 쉬운 일이다.
bool ParticleSystemClass::Frame(float frameTime, ID3D11DeviceContext* deviceContext)
{
    bool result;


    // Release old particles.
    KillParticles();

    // Emit new particles.
    EmitParticles(frameTime);

    // Update the position of the particles.
    UpdateParticles(frameTime);

    // Update the dynamic vertex buffer with the new position of each particle.
    result = UpdateBuffers(deviceContext);
    if(!result)
    {
        return false;
    }

    return true;
}
The Render function calls the RenderBuffers private function to render the particles.
Render 함수는 파티클을 렌더하기 위해 RenderBuffers private 함수를 부른다.
void ParticleSystemClass::Render(ID3D11DeviceContext* deviceContext)
{
    // Put the vertex and index buffers on the graphics pipeline to prepare them for drawing.
    RenderBuffers(deviceContext);

    return;
}
GetTexture returns a pointer to the particle texture resource.
GetTexture은 파티클 텍스처 리소스를 가리키는 포인터를 반환한다.
ID3D11ShaderResourceView* ParticleSystemClass::GetTexture()
{
    return m_Texture->GetTexture();
}
The GetIndexCount function returns the count of indexes in the index buffer for rendering.
GetIndexCount 함수는 렌더링에 사용되는 인덱스 버퍼의 인덱스 개수를 반환합니다.
int ParticleSystemClass::GetIndexCount()
{
    return m_indexCount;
}
LoadTexture loads the star01.tga file into a texture resource that can be used for rendering the particles.
LoadTexture 함수는 star01.tga 파일을 텍스처 리소스로 로드하여, 파티클 렌더링에 사용할 수 있도록 만듭니다.
bool ParticleSystemClass::LoadTexture(ID3D11Device* device, ID3D11DeviceContext* deviceContext, char* filename)
{
    bool result;


    // Create and initialize the texture object.
    m_Texture = new TextureClass;

    result = m_Texture->Initialize(device, deviceContext, filename);
    if(!result)
    {
        return false;
    }

    return true;
}
ReleaseTexture releases the texture resource that was used for rendering the particles.
ReleaseTexture 함수는 파티클 렌더링에 사용된 텍스처 리소스를 해제합니다.
The InitializeParticleSystem is where we initialize all the parameters and the particle system to be ready for frame processing.
InitializeParticleSystem 함수는 모든 파라미터와 파티클 시스템을 초기화하여 프레임 처리에 대비하는 곳입니다.
bool ParticleSystemClass::InitializeParticleSystem()
{
    int i;
We start by initializing all the different elements that will be used for the particle properties. For this particle system we set the random deviation of where the particles will spawn in terms of location. We also set the speed they will fall at and the random deviation of speed for each particle. After that we set the size of the particles. And finally, we set how many particles will be emitted every second as well as the total amount of particles allowed in the system at one time.
먼저, 파티클 속성에 사용될 다양한 요소들을 초기화하는 것부터 시작합니다.
이 파티클 시스템에서는 다음과 같은 설정을 수행합니다:
- 파티클이 생성될 위치의 무작위 편차(Random Deviation)를 설정하여, 일정한 위치가 아닌 범위 내에서 생성되도록 합니다.
- 각 파티클이 떨어지는 속도(Speed)와, 그 속도에 대한 무작위 편차를 설정합니다.
- 이어서 파티클의 크기(Size)를 설정합니다.
- 마지막으로, 초당 방출될 파티클 수와 한 번에 시스템 내에 존재할 수 있는 최대 파티클 수를 설정합니다.
	// Set the random deviation of where the particles can be located when emitted.
    m_particleDeviationX = 0.5f;
    m_particleDeviationY = 0.1f;
    m_particleDeviationZ = 2.0f;

    // Set the speed and speed variation of particles.
    m_particleVelocity = 1.0f;
    m_particleVelocityVariation = 0.2f;

    // Set the physical size of the particles.
    m_particleSize = 0.2f;

    // Set the number of particles to emit per second.
    m_particlesPerSecond = 100.0f;

    // Set the maximum number of particles allowed in the particle system.
    m_maxParticles = 1000;
We then create the particle array based on the maximum number of particles that will be used.
그 다음으로는, 사용될 최대 파티클 수를 기준으로 파티클 배열을 생성합니다.
	// Create the particle list.
    m_particleList = new ParticleType[m_maxParticles];
Set each particle in the array to inactive to begin with.
먼저 파티클 배열의 각 파티클을 모두 비활성 상태(inactive)로 설정합니다.
	 // Initialize the particle list.
    for(i=0; i<m_maxParticles; i++)
    {
        m_particleList[i].active = false;
    }
Initialize the two counters to zero to start with.
0 부터 시작하는 두 개의 카운터를 초기화한다.
	// Initialize the current particle count to zero since none are emitted yet.
    m_currentParticleCount = 0;

    // Clear the initial accumulated time for the particle per second emission rate.
    m_accumulatedTime = 0.0f;

    return true;
}
The ShutdownParticleSystem function releases the particle array during shutdown.
ShutdownParticleSystem 함수는 셧다운 시 파티클 배열을 해제한다.
void ParticleSystemClass::ShutdownParticleSystem()
{
    // Release the particle list.
    if(m_particleList)
    {
        delete [] m_particleList;
        m_particleList = 0;
    }

    return;
}
InitializeBuffers prepares the vertex and index buffer that will be used for rendering the particles. As the particles will be updated every frame the vertex buffer will need to be created as a dynamic buffer. At the beginning there are no particles emitted so the vertex buffer will be created empty.
InitializeBuffers 함수는 파티클 렌더링에 사용될 정점(Vertex) 버퍼와 인덱스(Index) 버퍼를 준비합니다.
파티클이 매 프레임마다 업데이트되기 때문에, 정점 버퍼는 동적 버퍼(Dynamic Buffer)로 생성되어야 합니다.
초기에는 방출된 파티클이 없으므로, 정점 버퍼는 빈 상태로 생성됩니다.
즉, 이후 프레임 처리 중에 버퍼가 계속 갱신될 준비를 하는 단계입니다.
bool ParticleSystemClass::InitializeBuffers(ID3D11Device* device)
{
    unsigned long* indices;
    int i;
    D3D11_BUFFER_DESC vertexBufferDesc, indexBufferDesc;
    D3D11_SUBRESOURCE_DATA vertexData, indexData;
    HRESULT result;


    // Set the maximum number of vertices in the vertex array.
    m_vertexCount = m_maxParticles * 6;

    // Set the maximum number of indices in the index array.
    m_indexCount = m_vertexCount;

    // Create the vertex array for the particles that will be rendered.
    m_vertices = new VertexType[m_vertexCount];

    // Create the index array.
    indices = new unsigned long[m_indexCount];

    // Initialize vertex array to zeros at first.
    memset(m_vertices, 0, (sizeof(VertexType) * m_vertexCount));

    // Initialize the index array.
    for(i=0; i<m_indexCount; i++)
    {
        indices[i] = i;
    }
Set the vertex buffer description to dynamic (D3D11_USAGE_DYNAMIC).
정점 버퍼 명세를 dynamic (D3D11_USAGE_DYNAMIC)으로 설정한다.
	// Set up the description of the dynamic vertex buffer.
    vertexBufferDesc.Usage = D3D11_USAGE_DYNAMIC;
    vertexBufferDesc.ByteWidth = sizeof(VertexType) * m_vertexCount;
    vertexBufferDesc.BindFlags = D3D11_BIND_VERTEX_BUFFER;
    vertexBufferDesc.CPUAccessFlags = D3D11_CPU_ACCESS_WRITE;
    vertexBufferDesc.MiscFlags = 0;
    vertexBufferDesc.StructureByteStride = 0;

    // Give the subresource structure a pointer to the vertex data.
    vertexData.pSysMem = m_vertices;
    vertexData.SysMemPitch = 0;
    vertexData.SysMemSlicePitch = 0;

    // Now finally create the vertex buffer.
    result = device->CreateBuffer(&vertexBufferDesc, &vertexData, &m_vertexBuffer);
    if(FAILED(result))
    {
        return false;
    }
The index buffer can stay static (D3D11_USAGE_DEFAULT) since the data in it never changes.
인덱스 버퍼는 데이터가 변하지 않기 때문에 D3D11_USAGE_DEFAULT(정적 버퍼)로 유지해도 됩니다.
The ShutdownBuffers function releases the vertex and index buffer during shutdown.
ShutdownBuffers 함수는 셧다운 동안 정점 버퍼와 인덱스 버퍼를 해제한다.
It also releases the vertex array.
또한 정점 배열도 해체한다.
void ParticleSystemClass::ShutdownBuffers()
{
    // Release the index buffer.
    if(m_indexBuffer)
    {
        m_indexBuffer->Release();
        m_indexBuffer = 0;
    }

    // Release the vertex buffer.
    if(m_vertexBuffer)
    {
        m_vertexBuffer->Release();
        m_vertexBuffer = 0;
    }

    // Release the vertices.
    if(m_vertices)
    {
        delete [] m_vertices;
        m_vertices = 0;
    }

    return;
}
RenderBuffers is used to draw the particle buffers.
RenderBuffers는 파티클 버퍼를 그리기 위해 사용한다.
It places the geometry on the pipeline so that the shader can render it.
이 함수는 셰이더가 파티클 버퍼를 렌더할 수 있도록 geometry를 파이프라인에 배치한다.
void ParticleSystemClass::RenderBuffers(ID3D11DeviceContext* deviceContext)
{
    unsigned int stride;
    unsigned int offset;


    // Set vertex buffer stride and offset.
    stride = sizeof(VertexType);
    offset = 0;

    // Set the vertex buffer to active in the input assembler so it can be rendered.
    deviceContext->IASetVertexBuffers(0, 1, &m_vertexBuffer, &stride, &offset);

    // Set the index buffer to active in the input assembler so it can be rendered.
    deviceContext->IASetIndexBuffer(m_indexBuffer, DXGI_FORMAT_R32_UINT, 0);

    // Set the type of primitive that should be rendered from this vertex buffer.
    deviceContext->IASetPrimitiveTopology(D3D11_PRIMITIVE_TOPOLOGY_TRIANGLELIST);

    return;
}
EmitParticles is called each frame to emit new particles. It determines when to emit a particle based on the frame time and the particles per second variable. If there is a new particle to be emitted then the new particle is created and its properties are set. After that it is inserted into the particle array in Z depth order. The particle array needs to be sorted in correct depth order for rendering to work using an alpha blend. If it is not sorted you will get some visual artifacts.
EmitParticles 함수는 매 프레임 호출되어 새로운 파티클을 방출합니다.
이 함수는 **프레임 시간(frame time)**과 **초당 방출할 파티클 수(particles per second)**를 기준으로 언제 파티클을 방출할지 결정합니다.
새로운 파티클이 방출될 경우, 해당 파티클이 생성되고 속성들이 설정됩니다.
그 후, 파티클은 Z 깊이 순서(depth order)에 맞게 파티클 배열에 삽입됩니다.
파티클 배열은 알파 블렌딩(투명도 처리)이 올바르게 동작하려면 깊이 순서대로 정렬되어야 하는데, 정렬이 제대로 되지 않으면 시각적으로 이상한 아티팩트가 발생할 수 있습니다.
따라서, 깊이 기반 정렬은 투명 파티클 렌더링에서 매우 중요한 단계입니다.
void ParticleSystemClass::EmitParticles(float frameTime)
{
    bool emitParticle, found;
    float positionX, positionY, positionZ, velocity, red, green, blue;
    int index, i, j;


    // Increment the frame time.
    m_accumulatedTime += frameTime;

    // Set emit particle to false for now.
    emitParticle = false;

    // Check if it is time to emit a new particle or not.
    if(m_accumulatedTime > (1.0f / m_particlesPerSecond))
    {
        m_accumulatedTime = 0.0f;
        emitParticle = true;
    }

    // If there are particles to emit then emit one per frame.
    if((emitParticle == true) && (m_currentParticleCount < (m_maxParticles - 1)))
    {
        m_currentParticleCount++;

        // Now generate the randomized particle properties.
        positionX = (((float)rand() - (float)rand())/RAND_MAX) * m_particleDeviationX;
        positionY = (((float)rand() - (float)rand())/RAND_MAX) * m_particleDeviationY;
        positionZ = (((float)rand() - (float)rand())/RAND_MAX) * m_particleDeviationZ;

        velocity = m_particleVelocity + (((float)rand() - (float)rand())/RAND_MAX) * m_particleVelocityVariation;

        red   = (((float)rand() - (float)rand())/RAND_MAX) + 0.5f;
        green = (((float)rand() - (float)rand())/RAND_MAX) + 0.5f;
        blue  = (((float)rand() - (float)rand())/RAND_MAX) + 0.5f;

        // Now since the particles need to be rendered from back to front for blending we have to sort the particle array.
        // We will sort using Z depth so we need to find where in the list the particle should be inserted.
        index = 0;
        found = false;
        while(!found)
        {
            if((m_particleList[index].active == false) || (m_particleList[index].positionZ < positionZ))
            {
                found = true;
            }
            else
            {
                index++;
            }
        }

        // Now that we know the location to insert into we need to copy the array over by one position from the index to make room for the new particle.
        i = m_currentParticleCount;
        j = i - 1;

        while(i != index)
        {
            m_particleList[i].positionX = m_particleList[j].positionX;
            m_particleList[i].positionY = m_particleList[j].positionY;
            m_particleList[i].positionZ = m_particleList[j].positionZ;
            m_particleList[i].red       = m_particleList[j].red;
            m_particleList[i].green     = m_particleList[j].green;
            m_particleList[i].blue      = m_particleList[j].blue;
            m_particleList[i].velocity  = m_particleList[j].velocity;
            m_particleList[i].active    = m_particleList[j].active;
            i--;
            j--;
        }

        // Now insert it into the particle array in the correct depth order.
        m_particleList[index].positionX = positionX;
        m_particleList[index].positionY = positionY;
        m_particleList[index].positionZ = positionZ;
        m_particleList[index].red       = red;
        m_particleList[index].green     = green;
        m_particleList[index].blue      = blue;
        m_particleList[index].velocity  = velocity;
        m_particleList[index].active    = true;
    }

    return;
}
The UpdateParticles function is where we update the properties of the particles each frame. In this tutorial we are updating the height position of the particle based on its speed which creates the particle water fall effect. This function can easily be extended to do numerous other effects and movement for the particles.
UpdateParticles 함수는 매 프레임마다 파티클의 속성들을 갱신하는 역할을 합니다.
이 튜토리얼에서는 파티클의 속도를 기준으로 높이 위치(height position)를 업데이트하여, 물이 떨어지는 듯한 워터폴(폭포) 효과를 만듭니다.
이 함수는 확장하기 쉽기 때문에, 다양한 다른 효과나 파티클의 움직임을 추가하는 데 활용할 수 있습니다.
즉, 기본 동작을 바탕으로 여러 가지 커스텀 동작을 구현할 수 있는 핵심 함수입니다.
void ParticleSystemClass::UpdateParticles(float frameTime)
{
    int i;


    // Each frame we update all the particles by making them move downwards using their position, velocity, and the frame time.
    for(i=0; i<m_currentParticleCount; i++)
    {
        m_particleList[i].positionY = m_particleList[i].positionY - (m_particleList[i].velocity * frameTime);
    }

    return;
}
The KillParticles function is used to remove particles from the system that have exceeded their rendering life time. This function is called each frame to check if any particles should be removed. In this tutorial the function checks if they have dropped below -3.0 height, and if so, they are removed and the array is shifted back into depth order again.
KillParticles 함수는 렌더링 수명이 끝난 파티클을 시스템에서 제거하는 역할을 합니다.
이 함수는 매 프레임 호출되어, 제거 대상이 되는 파티클이 있는지 확인합니다.
이 튜토리얼에서는 파티클의 높이 위치가 -3.0 이하로 떨어졌는지 검사하며, 조건을 만족하면 해당 파티클을 제거합니다.
파티클이 제거되면 배열 내에서 깊이 순서(depth order)를 유지하도록 나머지 파티클들을 앞으로 당겨 배열을 정렬합니다.
즉, 오래된 파티클을 정리하고, 올바른 렌더링 순서를 유지하는 중요한 함수입니다.
void ParticleSystemClass::KillParticles()
{
    int i, j;


    // Kill all the particles that have gone below a certain height range.
    for(i=0; i<m_maxParticles; i++)
    {
        if((m_particleList[i].active == true) && (m_particleList[i].positionY < -3.0f))
        {
            m_particleList[i].active = false;
            m_currentParticleCount--;

            // Now shift all the live particles back up the array to erase the destroyed particle and keep the array sorted correctly.
            for(j=i; j<m_maxParticles-1; j++)
            {
                m_particleList[j].positionX = m_particleList[j+1].positionX;
                m_particleList[j].positionY = m_particleList[j+1].positionY;
                m_particleList[j].positionZ = m_particleList[j+1].positionZ;
                m_particleList[j].red       = m_particleList[j+1].red;
                m_particleList[j].green     = m_particleList[j+1].green;
                m_particleList[j].blue      = m_particleList[j+1].blue;
                m_particleList[j].velocity  = m_particleList[j+1].velocity;
                m_particleList[j].active    = m_particleList[j+1].active;
            }
        }
    }

    return;
}
The UpdateBuffers function is called each frame and rebuilds the entire dynamic vertex buffer with the updated position of all the particles in the particle system.
UpdateBuffers 함수는 매 프레임 호출되며, 파티클 시스템 내 모든 파티클의 업데이트된 위치 정보를 반영하여 동적 정점 버퍼를 다시 생성(재구성) 합니다.
bool ParticleSystemClass::UpdateBuffers(ID3D11DeviceContext* deviceContext)
{
    int index, i;
    HRESULT result;
    D3D11_MAPPED_SUBRESOURCE mappedResource;
    VertexType* verticesPtr;


    // Initialize vertex array to zeros at first.
    memset(m_vertices, 0, (sizeof(VertexType) * m_vertexCount));

    // Now build the vertex array from the particle list array.  Each particle is a quad made out of two triangles.
    index = 0;

    for(i=0; i<m_currentParticleCount; i++)
    {
        // Bottom left.
        m_vertices[index].position = XMFLOAT3(m_particleList[i].positionX - m_particleSize, m_particleList[i].positionY - m_particleSize, m_particleList[i].positionZ);
        m_vertices[index].texture = XMFLOAT2(0.0f, 1.0f);
        m_vertices[index].color = XMFLOAT4(m_particleList[i].red, m_particleList[i].green, m_particleList[i].blue, 1.0f);
        index++;

        // Top left.
        m_vertices[index].position = XMFLOAT3(m_particleList[i].positionX - m_particleSize, m_particleList[i].positionY + m_particleSize, m_particleList[i].positionZ);
        m_vertices[index].texture = XMFLOAT2(0.0f, 0.0f);
        m_vertices[index].color = XMFLOAT4(m_particleList[i].red, m_particleList[i].green, m_particleList[i].blue, 1.0f);
        index++;

        // Bottom right.
        m_vertices[index].position = XMFLOAT3(m_particleList[i].positionX + m_particleSize, m_particleList[i].positionY - m_particleSize, m_particleList[i].positionZ);
        m_vertices[index].texture = XMFLOAT2(1.0f, 1.0f);
        m_vertices[index].color = XMFLOAT4(m_particleList[i].red, m_particleList[i].green, m_particleList[i].blue, 1.0f);
        index++;

        // Top left.
        m_vertices[index].position = XMFLOAT3(m_particleList[i].positionX - m_particleSize, m_particleList[i].positionY + m_particleSize, m_particleList[i].positionZ);
        m_vertices[index].texture = XMFLOAT2(0.0f, 0.0f);
        m_vertices[index].color = XMFLOAT4(m_particleList[i].red, m_particleList[i].green, m_particleList[i].blue, 1.0f);
        index++;

        // Top right.
        m_vertices[index].position = XMFLOAT3(m_particleList[i].positionX + m_particleSize, m_particleList[i].positionY + m_particleSize, m_particleList[i].positionZ);
        m_vertices[index].texture = XMFLOAT2(1.0f, 0.0f);
        m_vertices[index].color = XMFLOAT4(m_particleList[i].red, m_particleList[i].green, m_particleList[i].blue, 1.0f);
        index++;
    }

    // Lock the vertex buffer.
    result = deviceContext->Map(m_vertexBuffer, 0, D3D11_MAP_WRITE_DISCARD, 0, &mappedResource);
    if(FAILED(result))
    {
        return false;
    }

    // Get a pointer to the data in the vertex buffer.
    verticesPtr = (VertexType*)mappedResource.pData;

    // Copy the data into the vertex buffer.
    memcpy(verticesPtr, (void*)m_vertices, (sizeof(VertexType) * m_vertexCount));

    // Unlock the vertex buffer.
    deviceContext->Unmap(m_vertexBuffer, 0);

    return true;
}
D3dclass.cpp
In the D3DClass we needed to make a change to the Initialize function. We need to modify the alpha blending equation.
As we are going to blend the particles together when they overlap, we need to setup a blend state that works well for our particles. In this tutorial we use additive blending which adds the colors of the particles together when they overlap. To do so we set the SrcBlend (the incoming particle texture) to D3D11_BLEND_ONE so that all the color is added from it to the result. And we also set the DestBlend (the back buffer where we are writing the texture to) to D3D11_BLEND_ONE so that all the particles already written to the back buffer get added to the incoming texture. So, the equation ends up being color = (1 * source) + (1 * destination).
Note that our particles need to be sorted by depth for this equation to work. If they aren’t sorted some of the particles will show their black edges creating visual artifacts that ruin the expected result.
D3DClass의 Initialize 함수에서 알파 블렌딩 방정식을 수정해야 합니다.
파티클이 겹칠 때 서로 블렌딩되도록 하기 위해, 파티클에 적합한 블렌드 상태를 설정해야 합니다. 이 튜토리얼에서는 애드티브 블렌딩(Additive Blending) 방식을 사용합니다. 애드티브 블렌딩은 파티클이 겹칠 때 색상을 더하는 방식입니다.
이를 위해 다음과 같이 설정합니다:
-
SrcBlend (들어오는 파티클 텍스처) 를
D3D11_BLEND_ONE으로 설정하여, 파티클 색상이 결과에 100% 더해지도록 합니다. -
DestBlend (렌더링 대상인 백버퍼) 도
D3D11_BLEND_ONE으로 설정하여, 백버퍼에 이미 그려진 파티클 색상도 100% 더해지도록 합니다.
결과적으로 블렌딩 방정식은 다음과 같이 됩니다:
color = (1 * source) + (1 * destination)
중요: 이 블렌딩 방정식이 제대로 작동하려면 파티클이 깊이(depth) 순서대로 정렬되어 있어야 합니다.
정렬이 되어 있지 않으면 일부 파티클에서 검은 테두리(블랙 에지)가 나타나 시각적 이상 현상(아티팩트)이 발생하여 원하는 결과를 얻기 어렵습니다.
따라서 깊이 정렬과 올바른 블렌딩 설정은 파티클 렌더링에서 핵심 요소입니다.
// Create an alpha enabled blend state description.
blendStateDescription.RenderTarget[0].BlendEnable = TRUE;
blendStateDescription.RenderTarget[0].SrcBlend = D3D11_BLEND_ONE;
blendStateDescription.RenderTarget[0].DestBlend = D3D11_BLEND_ONE;
blendStateDescription.RenderTarget[0].BlendOp = D3D11_BLEND_OP_ADD;
blendStateDescription.RenderTarget[0].SrcBlendAlpha = D3D11_BLEND_ONE;
blendStateDescription.RenderTarget[0].DestBlendAlpha = D3D11_BLEND_ZERO;
blendStateDescription.RenderTarget[0].BlendOpAlpha = D3D11_BLEND_OP_ADD;
blendStateDescription.RenderTarget[0].RenderTargetWriteMask = 0x0f;
Applicationclass.h
////////////////////////////////////////////////////////////////////////////////
// Filename: applicationclass.h
////////////////////////////////////////////////////////////////////////////////
#ifndef _APPLICATIONCLASS_H_
#define _APPLICATIONCLASS_H_


///////////////////////
// MY CLASS INCLUDES //
///////////////////////
#include "d3dclass.h"
#include "inputclass.h"
#include "cameraclass.h"
The header for the TimerClass will be needed for timing the particles.
파티클의 타이밍을 처리하기 위해서는 TimerClass의 헤더 파일이 필요합니다.
The headers for the new ParticleShaderClass and ParticleSystemClass are added here to the ApplicationClass header file.
ParticleShaderClass와 ParticleSystemClass의 헤더 파일은 ApplicationClass의 헤더 파일에 추가되어야 합니다.
#include "particlesystemclass.h"
#include "particleshaderclass.h"


/////////////
// GLOBALS //
/////////////
const bool FULL_SCREEN = false;
const bool VSYNC_ENABLED = true;
const float SCREEN_DEPTH = 1000.0f;
const float SCREEN_NEAR = 0.3f;


////////////////////////////////////////////////////////////////////////////////
// Class name: ApplicationClass
////////////////////////////////////////////////////////////////////////////////
class ApplicationClass
{
public:
    ApplicationClass();
    ApplicationClass(const ApplicationClass&);
    ~ApplicationClass();

    bool Initialize(int, int, HWND);
    void Shutdown();
    bool Frame(InputClass*);

private:
    bool Render();

private:
    D3DClass* m_Direct3D;
    CameraClass* m_Camera;
The TimerClass variable is added here.
타이머 클래스 변수는 여기에 추가된다.
TimerClass* m_Timer;
We also add private member variables for the new ParticleShaderClass and ParticleSystemClass.
또한, ParticleShaderClass와 ParticleSystemClass에 대한 private 멤버 변수도 ApplicationClass에 추가해야 합니다.
	ParticleSystemClass* m_ParticleSystem;
    ParticleShaderClass* m_ParticleShader;
};

#endif
Applicationclass.cpp
////////////////////////////////////////////////////////////////////////////////
// Filename: applicationclass.cpp
////////////////////////////////////////////////////////////////////////////////
#include "applicationclass.h"
Initialize the pointers to null in the class constructor.
클래스 생성자에서 포인터를 null로 초기화한다.
ApplicationClass::ApplicationClass()
{
    m_Direct3D = 0;
    m_Camera = 0;
    m_Timer = 0;
    m_ParticleSystem = 0;
    m_ParticleShader = 0;
}


ApplicationClass::ApplicationClass(const ApplicationClass& other)
{
}


ApplicationClass::~ApplicationClass()
{
}


bool ApplicationClass::Initialize(int screenWidth, int screenHeight, HWND hwnd)
{
    char textureFilename[128];
    bool result;


    // Create and initialize the Direct3D object.
    m_Direct3D = new D3DClass;

    result = m_Direct3D->Initialize(screenWidth, screenHeight, VSYNC_ENABLED, hwnd, FULL_SCREEN, SCREEN_DEPTH, SCREEN_NEAR);
    if(!result)
    {
        MessageBox(hwnd, L"Could not initialize Direct3D.", L"Error", MB_OK);
        return false;
    }