Summary
In the previous tutorials, the world looks boring because all the objects are lit in the same way.
이전 튜토리얼에서, 이전 월드는 모든 물체가 똑같이 밝혀지기 때문에 지루해보였다.
This tutorial will introduce the concept of simple lighting and how it can be applied.
이 튜토리얼에서는 간단한 조명의 개념과 이를 적용하는 방법을 소개한다.
The technique used will be lambertian lighting.
이 기술은 램버시안 조명 개념을 사용한다.
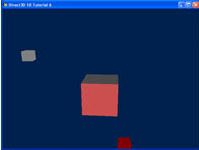
The outcome of this tutorial will modify the previous example to include a light source.
이번 튜토리얼의 결과는 이전 튜토리얼의 예제에 광원을 추가하도록 수정한 것이다.
This light source will be attached to the cube in orbit.
광원은 궤도에 있는 큐브에 부착될 것이다.
The effects of the light can be seen on the center cube.
빛의 효과는 중앙의 큐브를 통해 확인할 수 있을 것이다.
Source
(SDK root)\Samples\C++\Direct3D11\Tutorials\Tutorial06
Lighting
In this tutorial, the most basic type of lighting will be introduced: lambertian lighting.
이번 튜토리얼에서, 가장 단순한 형태의 조명: 램버시안 조명을 소개할 것이다.
Lambertian lighting has uniform intensity irrespective of the distance away from the light.
램버시안 조명은 빛으로부터의 거리에 관계없이 균일한 강도를 갖는다.
When the light hits the surface, the amount of light reflected is calculated by the angle of incidence the light has on the surface.
빛이 표면에 부딫힐 때, 반사되는 빛의 양은 빛이 표면에 닿는 입사각에 따라 계산된다.
When a light is shined directly on a surface, it is shown to reflect all the light back, with maximum intensity.
빛을 표면에 직접 비추면 모든 빛이 최대 강도로 반사되는 것으로 표시된다.
However, as the angle of the light is increased, the intensity of the light will fade away.
하지만, 빛의 각도가 증가할수록, 빛의 강도는 줄어든다.
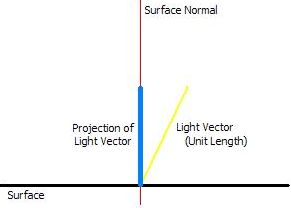
To calculate the intensity that a light has on a surface, the angle between the light direction and the normal of the surface has to be calculated.
빛이 표면에 미치는 강도를 계산하려면 빛의 방향과 표면의 법선 사이의 각도를 계산해야 한다.
The normal for a surface is defined as a vector that is perpendicular to the surface.
표면의 법선은 표면에 수직인 벡터로 정의된다.
The calculation of the angle can be done with a simple dot product, which will return the projection of the light direction vector onto the normal.
각도 계산은 간단한 내적으로 수행할 수 있으며, 내적은 빛 방향 벡터의 투영을 법선으로 반환한다.
The wider the angle, the smaller the projection will be.
각도가 넓을수록 투영은 더 작아집니다.
Thus, this gives us the correct function to modulate the diffused light with.
따라서 이를 통해 확산광을 변조할 수 있는 올바른 함수를 얻을 수 있습니다.
The light source used in this tutorial is an approximation of directional lighting.
이 튜토리얼에서 사용된 광원은 방향성 조명에 대한 근사치이다.
The vector which describes the light source determines the direction of the light.
광원을 설명하는 벡터에 따라 빛의 방향이 결정된다.
Since it’s an approximation, no matter where an object is, the direction in which the light shines towards it is the same.
근사치이므로 물체가 어디에 있든 빛이 물체를 향해 비추는 방향은 동일하다.
An example of this light source is the sun.
해를 이 광원의 예시로 들 수 있다.
The sun is always seen to be shining in the same direction for all objects in a scene.
태양은 장면의 모든 오브젝트에 대해 항상 같은 방향으로 비추는 것으로 보인다.
In addition, the intensity of the light on individual objects is not taken into consideration.
또한 개별 물체에 대한 빛의 강도는 고려되지 않는다.
Other types of light include point lights, which radiate uniform light from their centers, and spot lights, which are directional but not uniform across all objects.
다른 유형의 조명으로는 중앙에서 균일한 빛을 발산하는 포인트 조명과 방향성은 있지만 모든 물체에 균일하지 않은 스팟 조명이 있다.
Initializing the Lights
In this tutorial, there will be two light sources.
이번 튜토리얼에는 두개의 광원이 있을 것이다.
One will be statically placed above and behind the cube, and another one will be orbiting the center cube.
하나는 고정적으로 큐브의 후상단에 위치할 것이고, 나머지 하나는 중심 큐브를 따라 궤도를 회전하는 큐브이다.
Note that the orbiting cube in the previous tutorial has been replaced with this light source.
이전 튜토리얼의 궤도를 따라 돌던 큐브는 광원으로 대체되었다는 것을 인지하자.
Since lighting is computed by the shaders, the variables would have to be declared and then bound to the variables within the technique.
조명은 셰이더에 의해 계산되기 때문에, 변수를 선언한 다음 테크닉의 변수에 바인딩해야 한다.
In this sample, we just require the direction of the light source, as well as its color value.
이번 예제에서, 우리는 광원의 방향과 색상이 필요한다.
The first light is grey and not moving, while the second one is an orbiting red light.
첫번째 광원은 회색이고 움직이지 않으며, 두번째 광원은 붉은 색이며 궤도를 따라 회전한다.
// Setup our lighting parameters
XMFLOAT4 vLightDirs[2] =
{
	XMFLOAT4( -0.577f, 0.577f, -0.577f, 1.0f ),
	XMFLOAT4( 0.0f, 0.0f, -1.0f, 1.0f ),
};
XMFLOAT4 vLightColors[2] =
{
	XMFLOAT4( 0.5f, 0.5f, 0.5f, 1.0f ),
	XMFLOAT4( 0.5f, 0.0f, 0.0f, 1.0f )
};
The orbiting light is rotated just like the cube in the last tutorial.
두번째 광원은 저번 예제의 큐브처럼 궤도를 따라 회전한다.
The rotation matrix applied will change the direction of the light, to show the effect that it is always shining towards the center.
회전 행렬은 빛의 방향의 변화를 적용하며, 빛이 항상 중앙을 비추게끔 하는 효과가 있다.
Note that function XMVector3Transform is used to multiply a matrix with a vector.
XMVector3Transform 함수는 행렬과 벡터의 곱셈에 쓰인다는 사실을 기억하자.
In the previous tutorial, we multiplied just the transformation matrices into the world matrix, then passed into the shader for transformation.
이전 튜토리얼에서는 변환 행렬을 월드 행렬에 곱한 후에, 변환을 위한 셰이더에 전달하였다.
However, for simplicity’s sake in this case, we’re actually doing the world transform of the light in the CPU.
그러나 이 경우 단순화를 위해 실제로는 CPU에서 빛의 월드 변환을 수행한다.
// Rotate the second light around the origin
XMMATRIX mRotate = XMMatrixRotationY( -2.0f * t );
XMVECTOR vLightDir = XMLoadFloat4( &vLightDirs[1] );
vLightDir = XMVector3Transform( vLightDir, mRotate );
XMStoreFloat4( &vLightDirs[1], vLightDir );
The lights’ direction and color are both passed into the shader just like the matrices.
빛의 방향과 색상은 행렬과 마찬가지로 셰이더에 전달된다.
The associated variable is called to set, and the parameter is passed in.
관련 변수를 호출하여 설정하고 매개변수를 전달한다.
//
// Update matrix variables and lighting variables
//
ConstantBuffer cb1;
cb1.mWorld = XMMatrixTranspose( g_World );
cb1.mView = XMMatrixTranspose( g_View );
cb1.mProjection = XMMatrixTranspose( g_Projection );
cb1.vLightDir[0] = vLightDirs[0];
cb1.vLightDir[1] = vLightDirs[1];
cb1.vLightColor[0] = vLightColors[0];
cb1.vLightColor[1] = vLightColors[1];
cb1.vOutputColor = XMFLOAT4(0, 0, 0, 0);
g_pImmediateContext->UpdateSubresource( g_pConstantBuffer, 0, NULL, &cb1, 0, 0 );
Rendering the Lights in the Pixel Shader
Once we have all the data set up and the shader properly fed with data, we can compute the lambertian lighting term on each pixel from the light sources.
모든 데이터를 설정하고 셰이더에 데이터를 제대로 공급하면 광원으로부터 각 픽셀의 램버트 조명 항을 계산할 수 있다.
We’ll be using the dot product rule discussed previously.
앞서 설명한 내적을 사용할 것이다.
Once we’ve taken the dot product of the light versus the normal, it can then be multiplied with the color of the light to calculate the effect of that light.
빛과 노멀의 내적을 구한다음, 빛의 색을 곱하여 해당 빛의 효과를 계산할 수 있다.
That value is passed through the saturate function, which converts the range to [0, 1].
이 값은 포화 함수를 통과하여 범위를 [0, 1]로 변환합니다.
Finally, the results from the two separate lights are summed together to create the final pixel color.
마지막으로 두 개의 개별 조명에서 얻은 결과를 합산하여 최종 픽셀 색상을 생성한다.
Consider that the material of the surface itself is not factored into this light calculation.
표면 자체의 재질은 이 광원 계산에 고려되지 않는다는 점을 생각하라.
The final color of the surface is a result of the light’s colors.
표면의 최종 색은 빛의 색에 따라 결정된다.
//
// Pixel Shader
//
float4 PS( PS_INPUT input) : SV_Target
{
	float4 finalColor = 0;

	//do NdotL lighting for 2 lights
	for(int i=0; i<2; i++)
	{
		finalColor += saturate( dot( (float3)vLightDir[i],input.Norm) * vLightColor[i] );
	}
	return finalColor;
}
Once through the pixel shader, the pixels will be modulated by the lights, and you can see the effect of each light on the cube surface.
픽셀 셰이더를 통과하면 픽셀이 조명에 의해 변조되고 큐브 표면에서 각 조명의 효과를 확인할 수 있다.
Note that the light in this case looks flat because pixels on the same surface will have the same normal.
이 경우 같은 표면의 픽셀은 동일한 법선을 갖기 때문에 빛이 평평해 보인다.
Diffuse is a very simple and easy lighting model to compute.
디퓨즈는 매우 간단하고 계산하기 쉬운 조명 모델이다.
You can use more complex lighting models to achieve richer and more realistic materials.
더 복잡한 조명 모델을 사용하여 더 풍부하고 사실적인 머티리얼을 구현할 수 있다.