Open: Pasted image 20250726152301.png
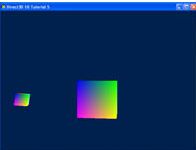
Summary
In the previous tutorial, we rendered a cube from model space to the screen.
이전 튜토리얼에서, 모델 공간의 큐브를 화면에 띄워보았다.
In this tutorial, we will extend the concept of transformations and demonstrate simple animation that can be achieved with these transformations.
이 튜토리얼에서, 변환의 개념을 확장하고 이러한 변환들을 통해 얻을 수 있는 간단한 애니메이션을 시연해볼 것이다.
The outcome of this tutorial will be an object that orbits around another.
이 튜토리얼의 결과는 다른 물체 주위를 도는 물체가 될 것이다.
It would be useful to demonstrate the transformations and how they can be combined to achieve the desired effect.
변환을 시현하고 원하는 효과를 얻기 위해 변환을 조합하는 방법을 배우는 것은 유용할 것이다.
Future tutorials will be building on this foundation as we introduce new concepts.
향후 튜토리얼에서는 이러한 기반을 바탕으로 새로운 개념을 소개할 예정이다.
Source
(SDK root)\Samples\C++\Direct3D11\Tutorials\Tutorial05
Transformation
In 3D graphics, transformation is often used to operate on vertices and vectors.
3차원 그래픽스에서, 변환은 정점들과 벡터들에 대한 작업에 보통 사용된다.
It is also used to convert them in one space to another.
변환은 또한 정점들과 벡터들을 한 공간에서 다른 공간으로 변환시키기 위해서도 사용된다.
Transformation is performed by way of multiplication with a matrix.
변환은 행렬 간 곱셈에 의해 이루어진다.
There are typically three types of primitive transformation that can be performed on vertices: translation (where it lies in space relative to the origin), rotation (its direction in relation to the x, y, z frame), and scaling (its distance from origin).
일반적으로 정점에 대해 수행할 수 있는 기본 변환에는 이동(원점을 기준으로 공간에 놓이는 위치), 회전(x, y, z 프레임에 대한 방향), 배율(원점과의 거리) 등 세 가지 유형이 있다.
In addition to those, projection transformation is used to go from view space to projection space.
이러한 변환들에 더하여, 뷰 공간에서 투영 공간으로 옮기는 투영 변환이 있다.
The XNA Math library contains APIs that can conveniently construct a matrix for many purposes such as translation, rotation, scaling, world-to-view transformation, view-to-projection transformation, and so on.
XNA 수학 라이브러리는 이동, 회전, 배율, 월드-뷰 변환, 뷰-투영 변환 등 다양한 용도를 가진 행렬들을 편리하게 만들게 해주는 API를 포함한다.
An application can then use these matrices to transform vertices in its scene.
실행프로그램은 씬의 정점들을 변환하기 위해 이러한 행렬들을 사용한다.
A basic understanding of matrix transformations is required.
행렬 변환에 대한 기본적인 이해가 필요하다.
We will briefly look at some examples below.
간단히 몇가지 예제를 살펴보자.
Translation
Translation refers to moving or displacing for a certain distance in space.
이동은 공간에서 일정 거리를 이동하거나 변위하는 것을 말한다.
In 3D, the matrix used for translation has the form
3차원에서, 이동을 위한 행렬은 다음과 같은 형태를 가진다.
1  0  0  0
0  1  0  0
0  0  1  0
a  b  c  1
where (a, b, c) is the vector that defines the direction and distance to move.
(a,b,c)는 움직일 방향과 거리를 규정하는 벡터이다.
For example, to move a vertex -5 unit along the X axis (negative X direction), we can multiply it with this matrix:
예를 들어, 정점을 x축으로(x축의 음의 방향으로) -5 단위만큼 움직이게 하기 위해 다음의 행렬을 곱한다.
1  0  0  0
0  1  0  0
0  0  1  0
-5  0  0  1
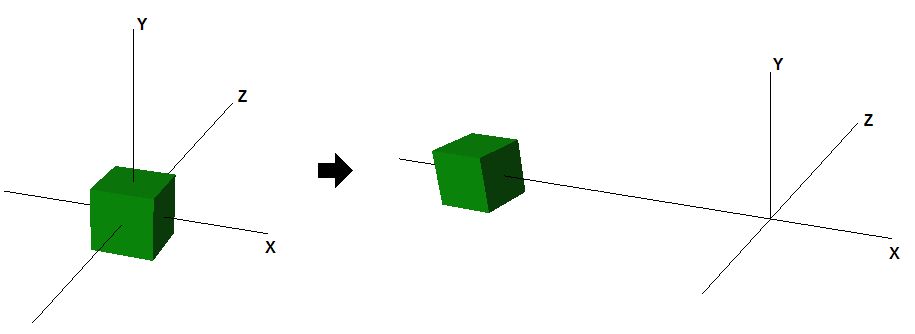
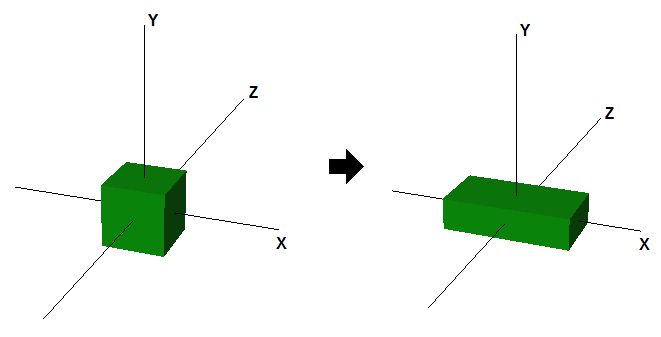
If we apply this to a cube object centered at origin, the result is that the box is moved 5 units towards the negative X axis, as figure 5 shows, after translation is applied.
이를 원점을 중심으로 한 큐브 객체에 적용하면 그림 5에 표시된 것처럼 변환이 적용된 후 상자가 음의 X축으로 5단위 이동하는 결과가 나타난난다.
Figure 1. The effect of translation
Open: Pasted image 20250726152423.png
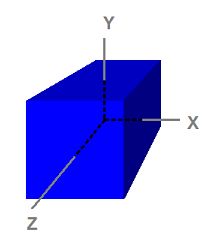
In 3D, a space is typically defined by an origin and three unique axes from the origin: X, Y and Z.
3차원에서 공간은 원점과 원점에서 뻗어나가는 세 개의 고유한 축: X, Y, Z로 구성된다.
There are several spaces commonly used in computer graphics: object space, world space, view space, projection space, and screen space.
컴퓨터 그래픽스에서 흔히 사용되는 공간들이 있다: 오브젝트 공간, 월드 공간, 뷰 공간, 투영 공간, 스크린 공간.
Figure 2. A cube defined in object space
보기 2. 오브젝트 공간에 정의된 큐브
Open: Pasted image 20250726152440.png
Rotation
Rotation refers to rotating vertices about an axis going through the origin.
회전 변환은 원점에서 뻗어나간 축을 기준으로 정점들을 회전시키는 것이다.
Three such axes are the X, Y, and Z axes in the space.
공간에는 X, Y, Z 세 개의 축이 있다.
An example in 2D would be rotating the vector [1 0] 90 degrees counter-clockwise.
벡터 [1, 0]을 시계 방향으로 90도 회전시키는 2차원 공간 예시를 들어보자.
The result from the rotation is the vector [0 1].
회전의 결과는 벡터 [0, 1]이다.
The matrix used for rotating ΐ degrees clockwise about the Y axis looks like this:
Y 축을 기준으로 ΐ도 만큼 시계 방향으로 회전시키는 행렬은 아래와 같다.
cosΐ  0  -sinΐ   0
 0    1     0    0
sinΐ  0   cosΐ  0
 0    0     0    1
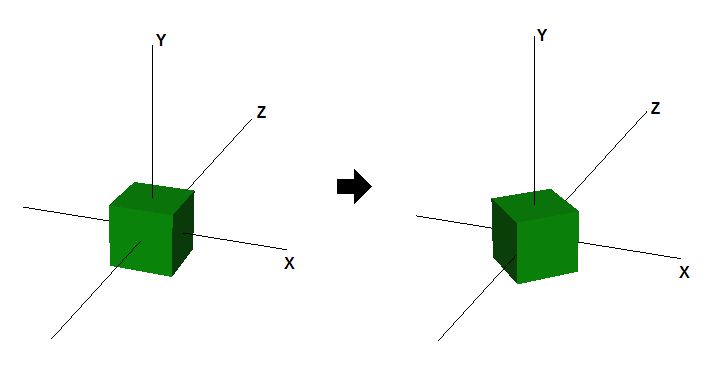
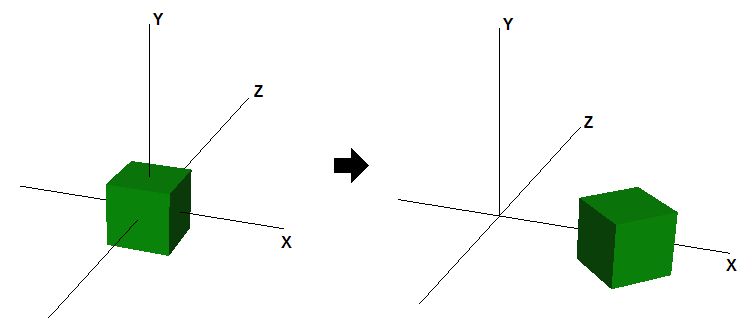
Figure 6 shows the effect of rotating a cube centered at origin for 45 degrees about the Y axis.
보기 6은 Y축을 따라서 원점 중앙에 위치한 큐브를 45도 회전시킨 효과를 보여준다.
Figure 3. The effect of rotation about the Y axis
보기 3. Y 축을 따라 회전한 효과
Open: Pasted image 20250726152515.png
Scaling
Scaling refers to enlarging or shrinking the size of vector components along axis directions.
배율은 축의 방향을 따라서 벡터 구성요소의 크기를 키우거나 줄이는 것을 말한다.
For example, a vector can be scaled up along all directions or scaled down along the X axis only.
예를 들어, 벡터는 모든 방향을 따라서 확대될 수도 있고 X축 방향으로만 축소될 수도 있다.
To scale, we usually apply the scaling matrix below:
배율을 위해서, 보통 아래와 같은 꼴의 행렬을 사용한다:
p  0  0  0
0  q  0  0
0  0  r  0
0  0  0  1
where p, q, and r are the scaling factor along the X, Y, and Z direction, respectively.
p, q, r은 각각 X, Y, Z 방향에 대응되는 배율 인자이다.
The figure below shows the effect of scaling by 2 along the X axis and scaling by 0.5 along the Y axis.
아래 보기는 X 방향으로 2배, Y 방향으로 0.5배 배율 변환을 실행한 예시이다.
Figure 4. The effect of Scaling
보기 4. 배율의 효과
Open: Pasted image 20250726152538.png
Multiple Transformations
To apply multiple transformations to a vector, we can simply multiply the vector by the first transformation matrix, then multiply the resulting vector by the second transformation matrix, and so on.
벡터에 여러 변환을 적용하려면 벡터에 첫 번째 변환 행렬을 곱한 다음 결과 벡터에 두 번째 변환 행렬을 곱하는 식으로 하면 된다.
Because vector and matrix multiplication is associative, we can also multiply all of the matrices first, then multiply the vector by the product matrix and obtain an identical result.
벡터와 행렬 곱셈은 결합 법칙이 성립하므로로 모든 행렬을 먼저 곱한 다음 벡터에 곱셈 행렬을 곱하여 동일한 결과를 얻을 수도 있다.
The figure below shows how the cube would end up if we combine a rotation and a translation transformation together.
아래 그림은 회전과 이동 변환을 함께 결합하면 큐브가 어떻게 완성되는지 보여준다.
Figure 5. The effect of rotation and translation
보기 5. 회전과 이동의 효과
Open: Pasted image 20250726152557.png
Creating the Orbit
In this tutorial, we will be transforming two cubes.
이번 튜토리얼에서, 두 개의 큐브에 변환을 적용할 것이다.
The first one will rotate in place, while the second one will rotate around the first, while spinning on its own axis.
첫번째 큐브는 제자리에서 회전하도록 할 것이며, 두번째 큐브는 자신의 축을 따라 자전하면서 첫번째 큐브 주위를 공전하도록 할 것이다.
The two cubes will have its own world transformation matrix associated with it, and this matrix will be reapplied to it in every frame rendered.
두 개의 큐브는 고유의 월드 변환 행렬을 가질 것이며, 이 행렬들은 모든 프레임마다 다시 적용되기를 반복할 것이다.
There are functions within XNA Math that will assist in the creation of the rotation, translation, and scaling matrices.
XNA Math의 함수들은 회전, 이동, 배율 행렬을 만드는 것을 보조한다.
-
Rotations performed around the X, Y. and Z axis are accomplished with the functions XMMatrixRotationX, XMMatrixRotationY, and XMMatrixRotationZ, respectively. They create basic rotation matrices that rotate around one of the primary axis. Complex rotations around other axis can be done by multiplying together several of them.
-
Translations can be performed by invoking the XMMatrixTranslation function. This function will create a matrix that will translate points specified by the parameters.
-
Scaling is done with XMMatrixScaling. It scales only along the primary axes. If scaling along arbitrary axis is desired, then the scaling matrix can be multiplied with an appropriate rotation matrix to achieve the effect.
-
X, Y, Z 축을 중심으로 한 회전은 각각 XMMatrixRotationX, XMMatrixRotationY, XMMatrixRotationZ 함수를 사용하여 수행합니다. 이 함수는 기본 축 중 하나를 중심으로 회전하는 기본 회전 행렬을 생성한다. 다른 축을 중심으로 복잡한 회전은 여러 축을 함께 곱하여 수행할 수 있습니다.
-
이동은 XMMatrixTranslation 함수를 호출하여 수행할 수 있다. 이 함수는 파라미터로 지정된 포인트를 이동하는 행렬을 생성합니다.
-
스케일링은 XMMatrixScaling으로 수행된다. 이 함수는 주 축을 따라서만 스케일을 조정한다. 임의의 축을 따라 스케일링이 필요한 경우 스케일링 행렬에 적절한 회전 행렬을 곱하여 효과를 얻을 수 있다.
The first cube will be spinning in place and act as the center for the orbit.
첫번째 큐브는 제자리에서 돌면서 궤도의 중심 역할을 수행한다.
The cube has a rotation along the Y axis applied to the associated world matrix.
큐브는 연관된 월드 매트릭스에 Y축을 따라 회전이 적용된다.
This is done by calling the XMMatrixRotationY function shown in the following code.
이는 다음 코드와 같이 XMMatrixRotationY 함수를 호출함으로서 구현할 수 있다.
The cube is rotated by a set amount each frame.
큐브는 매 프레임마다 설정된 양만큼 회전한다.
Since the cubes are suppose to continuously rotate, the value which the rotation matrix is based on gets incremented with every frame.
큐브들은 지속적으로 회전하도록 규정되어 있기 때문에, 회전 행렬의 기반이 되는 값은 매 프레임마다 조금씩 증가한다.
// 1st Cube: Rotate around the origin
g_World1 = XMMatrixRotationY( t );
The second cube will be orbiting around the first one.
두번째 큐브는 첫번째 큐브 주위를 회전할 것이다.
To demonstrate multiple transformations, a scaling factor, and its own axis spin will be added.
여러 변환을 보여주기 위해 스케일링 계수와 자체 축 스핀이 추가된다.
The formula used is shown right below the code (in comments).
사용된 방정식은 우측 하단의 아래 코드에 있다.
First the cube will be scale down to 30% size, and then it will be rotated along its spin axis (the Z axis in this case).
먼저 큐브를 30% 크기로 줄인다. 그런 후 스스로의 축(이 경우에는 Z축)을 따라 돌게 한다.
To simulate the orbit, it will get translated away from the origin, and then rotated along the Y axis.
궤도를 구현하기 위해서, 큐브는 원점으로부터 떨어진채 Y축을 따라 돌게 될 것이다.
The desired effect can be achieved by using four separate matrices with its individual transformation (mScale, mSpin, mTranslate, mOrbit), then multiplied together.
의도된 효과는 4개의 별도의 행렬(각각 mScale, mSpin, mTranslate, mOrbit에 대응하는 변환을 나타내는)을 사용하고, 곱함으로서 얻을 수 있다.
// 2nd Cube:  Rotate around origin
XMMATRIX mSpin = XMMatrixRotationZ( -t );
XMMATRIX mOrbit = XMMatrixRotationY( -t * 2.0f );
XMMATRIX mTranslate = XMMatrixTranslation( -4.0f, 0.0f, 0.0f );
XMMATRIX mScale = XMMatrixScaling( 0.3f, 0.3f, 0.3f );
g_World2 = mScale * mSpin * mTranslate * mOrbit;
An important point to note is that these operations are not commutative.
위 연산 간에는 교환 법칙이 성립하지 않는다는 사실을 기억해야한다.
The order in which the transformations are applied matter.
변환이 적용되는 순서는 중요하다.
Experiment with the order of transformation and observe the results.
변환 순서를 실험하고 결과를 관찰해보라.
Since all the transformation functions will create a new matrix from the parameters, the amount at which they rotate has to be incremented.
모든 변환 함수는 매개변수에서 새로운 행렬을 생성하기 때문에 회전하는 양을 증가시켜야 한다.
This is done by updating the “time” variable.
“time” 변수를 갱신시킴으로서 이를 충족할 수 있다.
// Update our time
t += XM_PI * 0.0125f;
Before the rendering calls are made, the constant buffer must be updated for the shaders.
렌더링 호출이 이루어지기 전에 셰이더에 대한 상수 버퍼를 업데이트해야 한다.
Note that the world matrix is unique to each cube, and thus, changes for every object that gets passed into it.
월드 행렬은 각 큐브마다 고유하며, 따라서 객체가 전달될 때마다 변경된다.
//
// Update variables for the first cube
//
ConstantBuffer cb1;
cb1.mWorld = XMMatrixTranspose( g_World1 );
cb1.mView = XMMatrixTranspose( g_View );
cb1.mProjection = XMMatrixTranspose( g_Projection );
g_pImmediateContext->UpdateSubresource( g_pConstantBuffer, 0, NULL, &cb1, 0, 0 );

//
// Render the first cube
//
g_pImmediateContext->VSSetShader( g_pVertexShader, NULL, 0 );
g_pImmediateContext->VSSetConstantBuffers( 0, 1, &g_pConstantBuffer );
g_pImmediateContext->PSSetShader( g_pPixelShader, NULL, 0 );
g_pImmediateContext->DrawIndexed( 36, 0, 0 );

//
// Update variables for the second cube
//
ConstantBuffer cb2;
cb2.mWorld = XMMatrixTranspose( g_World2 );
cb2.mView = XMMatrixTranspose( g_View );
cb2.mProjection = XMMatrixTranspose( g_Projection );
g_pImmediateContext->UpdateSubresource( g_pConstantBuffer, 0, NULL, &cb2, 0, 0 );

//
// Render the second cube
//
g_pImmediateContext->DrawIndexed( 36, 0, 0 );
The Depth Buffer
There is one other important addition to this tutorial, and that is the depth buffer.
이 튜토리얼에서 다룰 한 가지 중요한 주제가 더 있다. 바로 깊이 버퍼이다.
Without it, the smaller orbiting cube would still be drawn on top of the larger center cube when it went around the back of the latter.
깊이 버퍼 없이는, 커다란 중심 큐브를 공전하는 작은 큐브가 중심 큐브의 뒤쪽으로 들어가 가려짐에도 중심 큐브보다 앞쪽에 있는 것처럼 그려질수도 있다.
The depth buffer allows Direct3D to keep track of the depth of every pixel drawn to the screen.
깊이 버퍼를 사용하면 Direct3D가 화면에 그려지는 모든 픽셀의 깊이를 추적할 수 있다.
The default behavior of the depth buffer in Direct3D 11 is to check every pixel being drawn to the screen against the value stored in the depth buffer for that screen-space pixel.
Direct3D 11에서 뎁스 버퍼의 기본 동작은 화면에 그려지는 모든 픽셀을 해당 화면 공간 픽셀에 대해 뎁스 버퍼에 저장된 값과 비교하여 확인하는 것이다.
If the depth of the pixel being rendered is less than or equal to the value already in the depth buffer, the pixel is drawn and the value in the depth buffer is updated to the depth of the newly drawn pixel.
렌더링되는 픽셀의 깊이가 이미 깊이 버퍼에 있는 값보다 작거나 같으면 픽셀이 그려지고 깊이 버퍼의 값이 새로 그려진 픽셀의 깊이로 업데이트된다.
On the other hand, if the pixel being draw has a depth greater than the value already in the depth buffer, the pixel is discarded and the depth value in the depth buffer remains unchanged.
반면에 그리려는 픽셀의 깊이가 이미 깊이 버퍼에 있는 값보다 큰 경우 픽셀은 삭제되고 깊이 버퍼의 깊이 값은 변경되지 않는다.
The following code in the sample creates a depth buffer (a DepthStencil texture).
샘플의 다음 코드는 깊이 버퍼(DepthStencil 텍스처)를 생성한다.
It also creates a DepthStencilView of the depth buffer so that Direct3D 11 knows to use it as a Depth Stencil texture.
또한 Direct3D 11이 뎁스 스텐실 텍스처로 사용할 수 있도록 깊이 버퍼의 뎁스 스텐실 뷰를 생성한다.
// Create depth stencil texture
D3D11_TEXTURE2D_DESC descDepth;
ZeroMemory( &descDepth, sizeof(descDepth) );
descDepth.Width = width;
descDepth.Height = height;
descDepth.MipLevels = 1;
descDepth.ArraySize = 1;
descDepth.Format = DXGI_FORMAT_D24_UNORM_S8_UINT;
descDepth.SampleDesc.Count = 1;
descDepth.SampleDesc.Quality = 0;
descDepth.Usage = D3D11_USAGE_DEFAULT;
descDepth.BindFlags = D3D11_BIND_DEPTH_STENCIL;
descDepth.CPUAccessFlags = 0;
descDepth.MiscFlags = 0;
hr = g_pd3dDevice->CreateTexture2D( &descDepth, NULL, &g_pDepthStencil );
if( FAILED(hr) )
	return hr;

// Create the depth stencil view
D3D11_DEPTH_STENCIL_VIEW_DESC descDSV;
ZeroMemory( &descDSV, sizeof(descDSV) );
descDSV.Format = descDepth.Format;
descDSV.ViewDimension = D3D11_DSV_DIMENSION_TEXTURE2D;
descDSV.Texture2D.MipSlice = 0;
hr = g_pd3dDevice->CreateDepthStencilView( g_pDepthStencil, &descDSV, &g_pDepthStencilView );
if( FAILED(hr) )
	return hr;
In order to use this newly created depth stencil buffer, the tutorial must bind it to the device.
새로 만들어진 깊이 스텐실 버퍼를 사용하기 위해선 device에 바인딩해야 한다.
This is done by passing the depth stencil view to the third parameter of the OMSetRenderTargets function.
뎁스 스텐실 뷰를 OMSetRenderTargets 함수의 세번째 인자로 넘김으로서 이를 충족할 수 있다.
g_pImmediateContext->OMSetRenderTargets( 1, &g_pRenderTargetView, g_pDepthStencilView );
As with the render target, we must also clear the depth buffer before rendering.
렌더 타깃이 그러했듯이, 깊이 버퍼를 사용하기 전에도 깔끔히 정리해야 한다.
This ensures that depth values from previous frames do not incorrectly discard pixels in the current frame.
이렇게 하면 이전 프레임의 깊이 값이 현재 프레임의 픽셀을 잘못 버리지 않는다.
In the code below the tutorial is actually setting the depth buffer to be the maximum amount (1.0).
아래 코드에서는 실제로 깊이 버퍼를 최대 값(1.0)으로 설정하고 있다.
//
// Clear the depth buffer to 1.0 (max depth)
//